 Skip to content
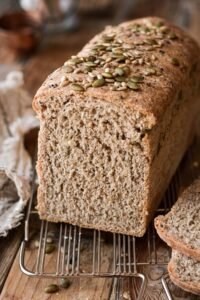
Introduction
Baking your own whole wheat sandwich bread is a deeply satisfying experience that transforms simple pantry staples into a loaf of golden goodness that fills your entire home with a heavenly aroma. This recipe is all about going back to basics and creating a healthy staple that serves as the foundation for so many wonderful meals like morning toast or hearty lunchtime sandwiches. Unlike the processed bread you find in the aisles of a typical grocery store which often contains strange additives and preservatives this homemade version relies on the natural power of yeast and high quality flour to achieve a perfect rise and a soft crumb. You will learn how to handle the dough with care and patience so that the final product is not only nutritious but also incredibly delicious and light. This guide is written for anyone who feels a little intimidated by the idea of baking bread but secretly dreams of pulling a warm and crusty loaf from their own oven to share with their loved ones on a quiet morning.
People all over the world love this specific type of bread because it offers a rustic and authentic flavor that you simply cannot replicate with factory made alternatives. There is a profound joy in knowing exactly what goes into your food and being able to control the quality of the ingredients that you and your family consume on a daily basis. The texture of a well made whole wheat loaf is sturdy enough to hold up to thick layers of peanut butter or juicy tomato slices without falling apart or getting soggy too quickly. It is a reliable and honest food that feels like a warm hug for your stomach and a delight for your senses every single time you take a bite. When you start making your own bread you will quickly discover that the taste of fresh baked goods is miles ahead of anything that has been sitting on a shelf for days or even weeks. It becomes a ritual that connects you to the history of baking and provides a sense of accomplishment that is truly hard to beat in our modern and automated lives.
There is never a bad time to bake a loaf of whole wheat bread because it fits into every season and every kind of daily routine with ease. You might choose to bake on a slow Sunday afternoon when the air is cool and the house is quiet because the act of kneading the dough can be a form of meditation that helps you clear your mind after a busy week. From a fitness perspective choosing whole wheat over white flour is a smart way to add more fiber and nutrients to your diet which helps keep your energy levels steady throughout the morning. This bread is the perfect companion for a healthy breakfast topped with some avocado or a side of protein because it keeps you feeling full and focused without the sudden sugar crashes that often come from refined carbohydrates. Whether you are baking for the joy of sharing with neighbors or to simply fill your kitchen with warmth and comfort this project provides an emotional boost that turns an ordinary day into something much more special and meaningful.
Entering the world of bread baking is a journey of discovery where you learn to work with living ingredients like yeast to create something that sustains and nourishes. We have carefully simplified every single step of this process to ensure that even if you have never touched a bag of flour in your life you can still succeed in creating a loaf that makes you proud. We will explore how to mix the ingredients and how to develop the gluten that gives the bread its structure and how to shape the loaf so it looks perfect every time you bake it. This article is your friendly guide and your companion in the kitchen as you move from being a beginner to someone who feels confident enough to tackle any dough. Get ready to put on your apron and wash your hands because we are about to start a fun and rewarding process that will change the way you think about your daily bread forever.
Ingredients You Will Need
To create a wonderful loaf of whole wheat sandwich bread you only need a few basic items that are likely already in your kitchen. Make sure your yeast is fresh so your bread rises well.
-
3 cups of whole wheat flour plus a little extra for dusting your counter
-
1 cup of warm water which should feel like a warm bath
-
2 tablespoons of honey to help the yeast grow and add a touch of sweetness
-
1 packet of active dry yeast which is about 2 and a quarter teaspoons
-
2 tablespoons of olive oil or melted butter for a soft texture
-
1 teaspoon of salt to balance out the flavors
-
1 extra tablespoon of oil or butter to grease the bowl and the pan
Step by Step Method
Activating the Yeast
In a small bowl mix your warm water with the honey and the yeast. Stir it gently and let it sit for about 5 to 10 minutes until you see a layer of foam on top. This foam is a sign that your yeast is alive and ready to work. If you do not see any foam after 10 minutes your yeast might be old and you should start over with a fresh packet to ensure your bread rises properly.
Mixing the Dough
In a large mixing bowl combine your whole wheat flour and the salt. Create a small well in the center and pour in your yeast mixture and the oil or butter. Use a wooden spoon to stir everything together until a shaggy dough starts to form. If the dough feels too dry and will not come together add another tablespoon of water but do it slowly so you do not make it too wet.
Kneading for Structure
Turn the dough out onto a clean surface lightly dusted with flour. Use the palms of your hands to push the dough away from you and then fold it back over itself. Continue this pushing and folding motion for about 8 to 10 minutes. You want the dough to become smooth and elastic to the touch. If you poke it with your finger it should slowly bounce back.
The First Rise
Place the kneaded dough into a clean bowl that has been lightly greased with oil. Cover the bowl with a clean kitchen towel and place it in a warm spot in your kitchen away from any cold drafts. Let it sit for about 1 to 2 hours until the dough has doubled in size. This patience is key to a light and fluffy loaf.
Shaping and Baking
Punch the risen dough down to let the air escape and then shape it into a log that fits into a greased loaf pan. Cover it again and let it rise for another 45 minutes until it looks puffy and tall. While it rises preheat your oven to 350 degrees Fahrenheit. Bake your bread for 30 to 35 minutes or until the top is golden brown and the loaf sounds hollow when you tap it on the bottom. Let it cool on a wire rack before you try to slice it.
Why This Recipe Is Special
This recipe is special because it uses the whole grain which includes the bran and the germ that are often removed in white flour production. This means you are getting more fiber and minerals and B vitamins in every single bite. The taste is deeper and nuttier than white bread and it has a heartiness that makes you feel genuinely satisfied after eating. It is a clean way to enjoy your carbs without relying on processed ingredients that often hide in supermarket versions. When you make it yourself you are choosing to nourish your body with real food made with nothing but time and care.
Extra Tips for Better Taste
To make your bread even better you can add a tablespoon of sunflower seeds or flax seeds into the dough for a delightful crunch. Another great trick is to brush the top of the loaf with a little bit of melted butter right after you take it out of the oven. This makes the crust soft and shiny and adds a lovely flavor that everyone loves. If you want a more complex flavor you can replace half of the water with milk which will make the crumb of the bread even softer and richer. Always remember to let the bread cool completely on a wire rack before slicing because it actually continues to cook and set as it cools down.
Final Thoughts
Baking your own whole wheat sandwich bread is a simple joy that has the power to turn a basic meal into something truly special. We hope that this guide has shown you that you do not need to be a professional to create something wholesome and delicious right in your own kitchen. There is a unique happiness that comes from making something with your own hands and knowing that you are providing something nutritious for yourself and your family. Keep practicing and do not be afraid to experiment with new seeds or grains to make this recipe your own. Thank you for joining us on this baking adventure and we wish you many warm loaves in your future.
Nutrition Details
The following table gives you an idea of the nutritional value per serving assuming you cut the loaf into 12 equal slices.
| Nutrient Type | Amount Per Serving |
| Calories | 140 calories |
| Total Fat | 3 grams |
| Saturated Fat | 1 gram |
| Cholesterol | 0 milligrams |
| Sodium | 190 milligrams |
| Total Carbohydrates | 24 grams |
| Dietary Fiber | 3 grams |
| Sugars | 2 grams |
| Protein | 5 grams |
| Calcium | 2 percent of daily value |