 Skip to content
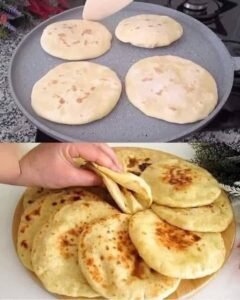
Perfect Homemade Pita Bread: A Beginner Guide
The Homemade Pita Bread Recipe is a wonderful exploration of ancient baking traditions brought directly into your modern kitchen space. This recipe is all about creating a soft, round flatbread that magically puffs up in the oven or on a hot skillet to create a hollow pocket inside. For beginners who are just starting to work with yeast, this dish is the absolute perfect entry point because the ingredient list is incredibly short and requires no complicated shaping skills. It is an amazing feeling to watch a flat piece of dough swell into a beautiful balloon right before your eyes, turning a simple baking project into a fun kitchen science experiment. By mastering this recipe, you will learn the core basics of kneading dough, managing yeast activation, and using high heat to create the perfect pocket bread that can hold your favorite sandwich fillings.
People absolutely love this recipe because it delivers a texture and freshness that store bought bread simply cannot match in any way. The contrast between the soft chewy exterior and the light airy interior makes every bite a true joy to experience during mealtime. Unlike commercial pita bread which can often feel dry, stiff, or prone to tearing, this homemade version stays completely pliable and tender, allowing you to stuff it completely full without any accidental breaking. Another major reason for the widespread love of this dish is the sheer magic of the pocket creation, which delights both children and adults as they slice the bread open to find the hollow center. It creates an interactive dining experience where everyone can open their own warm bread pocket and customize it with whatever ingredients they love the most.
You should make this recipe whenever you want to bring a sense of cozy warmth and accomplishment into your home, especially on a slow weekend afternoon when you can enjoy the therapeutic process of watching dough rise. From a health and fitness perspective, making your own bread is an exceptional choice because it lets you completely eliminate the artificial preservatives, conditioners, and massive amounts of processing sugar found in supermarket loaves. From an emotional standpoint, there is a deep and ancient satisfaction that comes from baking fresh bread, filling your entire house with a rich yeast aroma that instantly feels comforting and safe. It is also an excellent option for family cooking days because kids love to press the dough into circles and watch them puff up through the oven glass. Whether you need a fresh vessel for your summer chicken wraps, a soft bread to scoop up creamy hummus, or a healthy alternative to processed lunch wraps, this pita bread is the perfect choice.
Ingredients You Will Need
-
500 grams of unbleached all purpose white flour
-
7 grams of active dry yeast which is exactly one standard packet
-
350 milliliters of lukewarm water ensuring it feels warm but not hot to the touch
-
2 tablespoons of extra virgin olive oil
-
1 teaspoon of fine sea salt
-
1 teaspoon of organic honey or white granulated sugar to feed the yeast
Step by Step Method
The very first step is to get all your ingredients perfectly measured and arranged on your clean kitchen counter so you can work calmly without rushing. Take a small glass bowl and pour in fifty milliliters of your lukewarm water, then add the organic honey and sprinkle the active dry yeast directly over the top of the liquid. Stir the mixture gently with a spoon and let it sit undisturbed for about ten minutes until a thick layer of foam forms on the surface, which proves that your yeast is alive and ready to work.
In a separate large mixing bowl, combine the all purpose white flour and the fine sea salt, using a whisk to mix them thoroughly so the salt is evenly distributed through the powder. Make a deep well right in the center of your flour mixture and pour in the activated yeast liquid, the remaining three hundred milliliters of lukewarm water, and the extra virgin olive oil. Use a sturdy wooden spoon or your clean hands to stir the ingredients together, moving from the inside outward until a shaggy, sticky dough starts to hold together.
Dust your kitchen counter with a thin layer of extra flour and turn the sticky dough out onto the surface, getting ready for the fun process of kneading. Use the heels of your hands to push the dough forward away from your body, then fold it back over itself, rotate it slightly, and repeat the motion with a steady rhythm. Keep kneading the dough for about eight to ten minutes, adding tiny sprinkles of flour if it sticks to your fingers, until the surface becomes completely smooth, shiny, and elastic.
Shape the dough into a smooth ball and place it inside a clean bowl that you have lightly coated with a few drops of olive oil to prevent any sticking. Cover the top of the bowl tightly with a clean damp kitchen towel or plastic wrap and place it in a warm, draft free spot in your home for about one hour or until the dough doubles in volume. Once the dough has risen beautifully, gently press your fist into the center to deflate the air, then transfer it back to your lightly floured counter.
Use a sharp knife or a bench scraper to divide the large piece of dough into eight equal pieces, rolling each piece into a neat ball between your palms. Place the eight dough balls on the counter, cover them with your damp towel, and let them rest for fifteen minutes because this relaxation period makes the dough much easier to roll out. Take one dough ball at a time and use a rolling pin to flatten it into a circle that is about fifteen centimeters wide and roughly half a centimeter thick.
If you are using an oven, preheat it to two hundred and forty degrees Celsius, placing a heavy baking sheet or a pizza stone on the middle rack while it heats up so it gets incredibly hot. Carefully place two or three of your rolled dough circles directly onto the sizzling hot baking sheet and watch them cook for about three minutes until they puff completely open like balloons. Flip the bread over using tongs and cook for one more minute until the bottom shows tiny golden brown spots, then remove them and immediately wrap them in a clean towel to keep them soft while you cook the rest.
Why This Recipe Is Special
This recipe is truly special because it showcases the beauty of minimalist cooking, proving that you can create an exquisite staple food using just water, flour, and patience. The inclusion of high quality extra virgin olive oil adds a subtle fruity undertone to the bread while providing healthy monounsaturated fats that are wonderful for your cardiovascular system. Because this bread is made completely from scratch, it maintains a clean ingredient profile that is completely free from hidden stabilizers, commercial enzymes, or high fructose corn syrup.
The physical structure of the pita bread is a marvel of natural food science because the intense heat transforms the internal moisture into steam, trapping it inside the dough walls to create a natural pocket without any artificial cutting. This unique layout makes it the most efficient sandwich vessel in the world because it contains your fillings securely from all sides, preventing mess and leaks. The taste is a beautiful balance of mild grain sweetness and a deep yeasty richness that complements both sweet spreads like honey and savory elements like roasted meats. Ultimately, this dish celebrates the joy of honest, basic baking that empowers you to take control of what goes into your body while delivering a superior gourmet flavor.
Extra Tips for Better Taste
To ensure you get the absolute best puff and taste every single time you bake, you must make sure your oven or your stovetop skillet is fully preheated and screaming hot before the dough touches the surface. If the cooking surface is not hot enough, the steam will not expand quickly enough to separate the layers, resulting in a flat bread without a pocket center. You can substitute half of the white flour with whole wheat flour to introduce a rich, nutty flavor profile and a significant boost of dietary fiber into your daily diet.
Always keep your rolled dough circles covered with a damp towel while waiting for their turn to cook because if the skin of the dough dries out, it becomes too stiff to expand properly in the heat. Try brushing the finished, hot pita breads with a tiny amount of melted butter or garlic oil the exact moment they come out of the heat to lock in the moisture and create a luxurious glossy finish. If you want to use a stovetop method instead of an oven, use a heavy cast iron skillet over medium high heat, cooking the dough circle for one minute on each side until the beautiful steam pockets begin to swell naturally.
When rolling out your dough circles, try to ensure your rolling pin exerts equal pressure across the entire surface because uneven thickness can cause the steam to escape from a thin spot, preventing the rest of the pocket from opening. Lastly, if you have extra pita breads that you cannot finish within two days, allow them to cool completely, place them in a zip bag, and store them in the freezer for up to three months, reheating them in a toaster for a fresh experience.
Final Thoughts
In conclusion, taking the time to learn how to bake your own fresh pita bread is a deeply rewarding culinary milestone that will transform your daily meals and boost your kitchen confidence. It is a classic, timeless recipe that highlights the power of patience and simple ingredients to create something far better than anything you can buy in a plastic supermarket package. We hope this step by step guide gives you all the reassurance and clarity you need to enjoy the magical process of bread baking from the comfort of your home. Share these warm, hollow pockets with your loved ones, experiment with creative sandwich fillings, and enjoy the wonderful journey of making honest food with your own hands.
Nutrition Details
| Nutrient Factor | Amount Per Serving (1 Pita Bread) | Percentage Daily Value |
| Total Energy Calories | 240 kcal | 12 percent |
| Protein content | 6 grams | 12 percent |
| Total Fat lipid | 4 grams | 5 percent |
| Saturated Fat | 1 gram | 5 percent |
| Total Carbohydrates | 44 grams | 16 percent |
| Dietary Fiber benefit | 2 grams | 7 percent |
| Natural Sugars | 1 gram | 0 percent |
| Sodium level | 290 milligrams | 13 percent |
| Calcium strength | 10 milligrams | 1 percent |
| Iron element | 2 milligrams | 11 percent |
Disclaimer
Please remember that every human body is completely unique and individual nutritional goals, digestive systems, or allergen sensitivities can vary widely from person to person. The nutrition estimations listed in this article are calculated using standard database software values, and your final results may change based on the specific brand of flour and yeast you use. This recipe text is intended for general informational and home cooking enjoyment purposes and should never be used to replace professional medical advice or dietary prescriptions. You should always speak with a certified doctor or a registered nutritionist if you are making major changes to your carbohydrate intake or managing a specific health condition.