 Skip to content
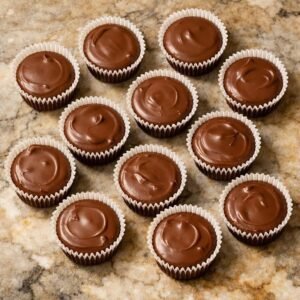
The chocolate peanut butter cup is a legendary treat that brings together two of the most popular flavors in the history of snacks. This recipe is all about recreating that famous store bought candy right in your own kitchen using simple and wholesome ingredients that you can actually pronounce. It features a thick and snappy outer shell made of rich melted chocolate and a smooth and salty center filled with creamy peanut butter. While many people think that making candy at home is a very difficult task this particular recipe is designed to be completely stress free and accessible for anyone regardless of their cooking experience. You do not need a candy thermometer or any special professional equipment to get a perfect result every single time you try it. By making these yourself you have total control over the quality of the ingredients which means you can avoid the extra preservatives and artificial fillers found in commercial versions. It is a wonderful way to enjoy a classic dessert while knowing exactly what is going into your body and the bodies of your loved ones.
People absolutely love this recipe because it offers a level of satisfaction that is very hard to beat with any other kind of snack. The combination of sweet chocolate and savory peanut butter creates a perfect harmony on your tongue that hits all the right notes at once. There is something deeply rewarding about biting into a homemade cup and hearing that crisp snap of the chocolate before reaching the soft and nutty middle. Many families enjoy making these together as a fun weekend activity because the steps are simple enough for children to help with the mixing and the pouring. It is a versatile treat that can be customized to be as healthy or as indulgent as you want it to be depending on your mood. Because they are individual bite sized portions they are very easy to share at parties or to pack into lunch boxes for a little midday surprise. The homemade version often tastes much fresher and more vibrant than the pre packaged ones which makes it a huge hit with anyone who has a bit of a sweet tooth.
You should consider making these chocolate peanut butter cups whenever you feel like you need a little boost of energy or a moment of pure culinary joy. They are a fantastic option for a high protein snack that can satisfy your cravings after a tough workout or a long day at the office. Many people find that the healthy fats in the peanut butter help them feel full and satisfied for much longer than a typical sugary snack would. From an emotional perspective there is a great sense of pride that comes from making your own candy and seeing it look just as good as the ones from the store. You might want to make a big batch for a holiday gathering or as a thoughtful handmade gift for a friend who is going through a hard time. These treats are also perfect for a movie night at home when you want something special to nibble on while you relax on the couch. Whether you are focused on your fitness goals or you just want to spread some happiness through food this recipe is a reliable and delicious choice that will never let you down.
Ingredients You Will Need
To make these delicious homemade candy cups you will need to gather a few simple items that are likely already sitting in your kitchen cupboards.
-
Two cups of high quality semi sweet chocolate chips or dark chocolate
-
One cup of creamy peanut butter without added sugar
-
Half a cup of powdered sugar to sweeten the center
-
Three tablespoons of melted coconut oil to make the chocolate smooth
-
One teaspoon of pure vanilla extract
-
Half a teaspoon of fine sea salt to enhance the flavors
-
Optional coarse sea salt for sprinkling on top
Step by Step Method
Creating your own chocolate peanut butter cups is a very fun and easy process that involves a little bit of melting and a little bit of waiting for the magic to happen.
First you need to get your muffin tin ready so that you can easily remove the candies once they are set. Take a standard muffin tin or a mini muffin tin and line the holes with paper or silicone liners. This is a very important step because if you pour the chocolate directly into the metal tin it will stick and be very hard to get out later. If you are using a mini tin you will be able to make more bite sized treats which is great for portion control.
Next you will work on the chocolate shell that holds everything together. Place your two cups of chocolate chips and the three tablespoons of coconut oil into a microwave safe glass bowl. Heat the mixture in thirty second intervals and stir well between each session until the chocolate is completely liquid and shiny. The coconut oil is a secret ingredient that helps the chocolate melt more evenly and gives the final cup a nice snap when you bite into it. Once the chocolate is ready set it aside for a few minutes to cool down slightly.
Now you will prepare the creamy peanut butter filling that goes in the middle. In a medium sized mixing bowl combine the one cup of creamy peanut butter and the half cup of powdered sugar and the vanilla extract and the fine sea salt. Use a sturdy spoon or a spatula to mix everything together until it forms a smooth and slightly thick paste. If your peanut butter is very thin you might want to add a little more powdered sugar to make it easier to handle. Taste the mixture and add a tiny bit more salt if you really like that sweet and salty contrast.
Now it is time to start building the layers of your candy cups. Take a small spoon and pour about one tablespoon of the melted chocolate into the bottom of each muffin liner. Use the back of the spoon to spread the chocolate slightly up the sides of the liner so that it creates a little wall for the filling. Once all the liners have a bottom layer of chocolate place the tray in the freezer for about ten minutes so the chocolate can harden.
Once the bottom layer is firm to the touch you can add the peanut butter center. Take a small scoop of the peanut butter mixture and roll it into a little ball or just drop it directly onto the center of the hardened chocolate. Use your finger or a spoon to gently press the peanut butter flat so that it does not stick up too high. You want to leave enough room at the top for the final layer of chocolate to cover everything completely.
Finish the process by pouring another tablespoon of melted chocolate over the top of each peanut butter disc. You might need to gently tap the tray on the counter to help the chocolate level out and fill in all the gaps around the sides. If the chocolate has started to harden in the bowl just pop it back in the microwave for a few seconds until it is liquid again. For a beautiful finish you can sprinkle a few grains of coarse sea salt on the top of each cup while the chocolate is still wet.
Place the entire tray back into the refrigerator or the freezer for at least thirty minutes to an hour. You want the chocolate to be completely solid before you try to peel away the paper liners. Once they are firm you can take them out and enjoy them immediately or store them in a sealed container. It is best to keep these in the fridge if your house is warm so that the coconut oil does not melt and make them soft.
Why This Recipe Is Special
This recipe is special because it allows you to enjoy a classic favorite without any of the guilt or mystery ingredients that come with store bought candy. By using real peanut butter and high quality chocolate you are giving your body a snack that is rich in healthy fats and proteins and minerals. Peanut butter is a great source of Vitamin E and magnesium which are both very important for maintaining a healthy nervous system and strong muscles.
The taste of a homemade peanut butter cup is much more intense and satisfying because you can really taste the quality of the cocoa and the roasted nuts. It is a special experience to share something you made yourself with your friends because it shows that you took the time to create something delicious from scratch. This recipe is also a great way to save money because you can make a large batch for a fraction of the price of buying individual packs at the store.
Extra Tips for Better Taste
If you want to make your chocolate peanut butter cups even more interesting you can try a few creative ideas to change the flavor and texture. You can use crunchy peanut butter instead of creamy if you like a bit of extra texture in the middle of your candy. Some people like to stir in a few chopped roasted peanuts or even some tiny pieces of pretzels to the peanut butter mixture for a really big crunch.
Another great tip is to try different kinds of chocolate like white chocolate or a very dark eighty percent cocoa bar to see which one you prefer. You could even swirl a little bit of caramel sauce or strawberry jam on top of the peanut butter layer before you add the final chocolate lid for a surprise flavor inside. If you want to make these even healthier you can replace the powdered sugar with a little bit of maple syrup or honey but keep in mind that this will make the filling a bit softer.
Final Thoughts
Making your own treats at home is a wonderful way to bring a little bit of magic and sweetness into your daily routine. This chocolate peanut butter cup recipe is a perfect example of how simple it can be to create something truly special with just a few ingredients and a little bit of patience. We hope that you have a lot of fun making these and that they become a new favorite snack for you and your family. There is nothing quite like the joy of a homemade dessert that tastes exactly how you want it to. Happy snacking and enjoy every single bite of your delicious creation.
Nutrition Details
This table shows the approximate nutrition for one homemade chocolate peanut butter cup using standard ingredients.
Disclaimer
Please remember that everyone has a different body and nutritional needs so the way your body reacts to this snack may change from person to person. This recipe is intended for general enjoyment and is not a substitute for professional health or dietary advice from a doctor or a nutritionist. If you have a nut allergy you should not make this recipe or you should try using a seed butter like sunflower butter instead. Always be careful when using the microwave or handling hot bowls to ensure you stay safe in the kitchen.