 Skip to content
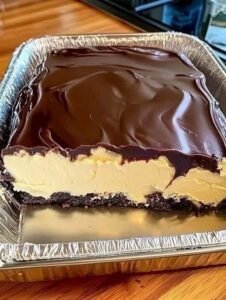
If you are looking for a spectacular dessert that delivers all the rich, creamy goodness of a traditional French bakery treat without any of the complicated baking steps, you have come to the right place today. The homemade chocolate eclair cake is a beautiful, no bake icebox dessert that recreates the iconic flavors of a classic choux pastry éclair using simple, accessible ingredients. This magnificent dish layers crisp honey graham crackers with a velvety, smooth vanilla pudding cream filling, all topped off with a rich layer of glossy chocolate ganache glaze. As the assembled dish rests quietly inside your refrigerator overnight, the crisp crackers absorb the natural moisture from the pudding layers, magically softening into a tender, cake like texture that mimics real pastry perfectly.
People all over the world are absolutely falling in love with this clever dessert because it provides a foolproof way to satisfy a large crowd with very minimal kitchen effort. Traditional French éclairs require intensive dough piping, careful egg integration, and precise oven temperatures that can easily frustrate beginner bakers. This smart no bake variation eliminates all of that stress completely, allowing you to assemble a giant, beautiful pan of cream and chocolate using nothing more than a whisk and a spatula. Every single bite delivers a luxurious combination of cool vanilla cream, soft graham cracker layers, and a deep chocolate finish that melts smoothly on your tongue, making it an absolute favorite for kids and adults alike.
You should definitely make this wonderful recipe whenever you want to bring pure joy to a summer backyard barbecue, celebrate a family birthday milestone, or surprise your coworkers at a weekend potluck gathering. On hot afternoon days when the thought of turning on a fiery kitchen oven sounds completely exhausting, this refreshing chilled treat offers the perfect sweet escape to keep your kitchen perfectly cool. While it is certainly a rich and indulgent comfort food, you can easily modify the layers using skim milk, sugar free pudding mixes, and light whipped toppings to create a fitness friendly reward after a hard week of exercise. Whatever your personal motivation might be, slicing into this beautiful, glossy chocolate crown will spread instant happiness across your dinner table and create sweet memories with the people you care about most.
Ingredients You Will Need
To construct this incredibly creamy and delicious no bake dessert, you will need to gather a few simple ingredients from your local grocery store dairy and baking aisles. The exact quantities and units are clearly listed below to ensure your filling sets up perfectly and your layers look absolutely beautiful.
-
Honey graham crackers: 400 grams
-
Instant vanilla pudding mix dry powder: 2 packs of 100 grams each
-
Whole milk chilled completely: 720 milliliters
-
Frozen whipped topping thawed completely: 225 grams
-
Granulated white sugar for the glaze: 100 grams
-
Unsweetened cocoa powder premium quality: 40 grams
-
Whole milk for the glaze layer: 60 milliliters
-
Unsalted butter sliced into pieces: 60 grams
-
Pure vanilla extract: 5 milliliters
Step by Step Method
Assembling this recipe is exceptionally easy and takes less than twenty minutes of active preparation time before it goes into the refrigerator. Even if you have never made a single dessert from scratch in your life, following these clear instructions will guarantee a beautiful result that looks highly professional.
First, you need to prepare your mixing workspace by setting out a large glass rectangular baking dish that measures roughly thirty centimeters long and twenty centimeters wide. Open your boxes of honey graham crackers and arrange a single, tight layer of whole crackers across the entire bottom surface of the clean dish, breaking a few pieces gently with your fingers if necessary to fill any open gaps completely.
Next, take a large mixing bowl and pour in the two packages of instant vanilla pudding dry powder along with the seven hundred twenty milliliters of cold whole milk. Use a sturdy hand whisk to beat the liquid and powder together continuously for about two full minutes until the mixture begins to thicken and feels completely smooth with no dry lumps remaining.
Now, open your container of thawed whipped topping and use a flexible silicone spatula to gently fold the entire two hundred twenty five grams into the vanilla pudding mixture. Move your spatula in slow circles from the bottom of the bowl up to the top until the yellow pudding and white cream blend into a singular, fluffy, pale cream filling that holds its shape beautifully.
Carefully spoon exactly half of this fluffy vanilla cream filling directly over your base layer of graham crackers inside the baking dish. Use the back of a large spoon or an offset metal spatula to smooth the cream out into a completely flat, even layer that covers every single corner of the crackers.
Take out more honey graham crackers and arrange a second single layer tightly over the top of the smooth vanilla cream layer. Press down very gently with your fingertips so the crackers bond with the pudding underneath without pushing the cream out through the sides of the pan.
Spoon the remaining half of your vanilla pudding cream mixture over this second cracker layer, smoothing the surface out beautifully just like you did before. Finish the structural assembly by placing a third and final layer of honey graham crackers evenly across the top of the cream, creating a neat flat ceiling for your cake.
Now it is time to prepare the rich chocolate glaze layer on your kitchen stove. Place a small saucepan over medium heat and combine the one hundred grams of granulated white sugar, forty grams of unsweetened cocoa powder, and sixty milliliters of whole milk together, stirring continuously with a whisk as the mixture comes to a gentle rolling boil.
As soon as the chocolate liquid begins to bubble, let it cook for exactly one minute while stirring constantly to prevent the sugar from burning on the bottom of the pan. Remove the saucepan from the hot stove immediately, then add the sixty grams of sliced unsalted butter and five milliliters of pure vanilla extract into the hot liquid.
Whisk the glaze vigorously until the butter melts completely and integrates into the cocoa, creating a beautifully smooth, glossy, and thick chocolate pourable icing. Let the glaze cool on your counter for five minutes so it is warm but not piping hot, which prevents it from melting the delicate cream layer underneath the top crackers.
Carefully pour the warm chocolate glaze evenly over the top layer of graham crackers, using your spatula to guide the rich icing to all the outer edges until the entire cake is covered in a shiny dark mirror. Place the uncovered baking dish straight into your refrigerator and let it chill undisturbed for at least eight full hours, though leaving it overnight is highly recommended to ensure the crackers soften completely into a tender cake texture. Slice into square portions using a sharp knife and serve chilled.
Why This Recipe Is Special
This recipe stands out from traditional baking options because it perfectly highlights the beautiful science of icebox cakes, where time and moisture do all the difficult structural work instead of an oven. By allowing the dry crackers to slowly hydrate inside the dense vanilla pudding cream, you achieve a delicate layered texture that closely mimics professional pastry layers without requiring any rolling pins or dough handling.
From a health standpoint, making this dessert at home allows you to easily customize the internal components to fit your personal nutritional requirements or dietary boundaries. You can easily reduce the total sugar and fat content by selecting fat free milk, organic dairy alternatives, and sugar free instant pudding varieties, creating a much lighter treat that satisfies your sweet tooth without overloading your body with heavy saturated fats.
Another reason this recipe is so special is its exceptional shelf life and flavor development during storage. Unlike traditional sponge cakes that can quickly dry out and turn stale when exposed to air, this icebox cake actually tastes significantly better on the second and third day as the chocolate glaze, vanilla cream, and honey crackers melt together into a harmonious flavor profile that stays perfectly moist.
Extra Tips for Better Taste
If you want to elevate this simple no bake treat to an even higher level of gourmet excellence, you can try a few creative adjustments to suit your personal palate. The quality of your chocolate glaze will define the final impression of the cake, so consider using high quality Dutch processed cocoa powder which delivers a much darker color and a smoother, less acidic chocolate flavor profile.
You can also experiment with introducing different flavor varieties into your cream layers to create an exciting twist on the classic vanilla profile. Try using instant banana cream pudding, rich butterscotch pudding, or white chocolate pudding mixes instead of vanilla to surprise your family with an entirely new taste experience that keeps dessert time exciting.
For an incredibly luxurious texture contrast, you can scatter a handful of finely chopped toasted pecans, sliced almonds, or mini semi sweet chocolate chips directly over the internal cream layers right before laying down the next row of graham crackers. This simple addition introduces a wonderful, unexpected crunch that cuts through the velvety softness of the pudding beautifully.
If you love fruit flavor combinations, you can arrange a dense layer of thinly sliced fresh bananas or sweet red strawberries directly on top of the first cream layer before adding the crackers. The combination of fresh fruit, vanilla pudding, and rich chocolate glaze creates a magnificent banana split or chocolate covered strawberry profile that feels highly festive.
For those who enjoy a subtle hint of coffee aroma, you can whisk a single teaspoon of instant espresso powder directly into the hot chocolate glaze along with the butter and vanilla extract. The espresso works as a natural flavor enhancer that deepens the characteristics of the cocoa powder without making the cake taste strongly of coffee, resulting in a much richer chocolate experience.
Final Thoughts
Creating unforgettable homemade desserts should never feel like a stressful chore, and this classic chocolate eclair cake proves that you can achieve bakery quality results using simple techniques and basic grocery store staples. It is a highly dependable, fun, and deeply satisfying recipe that turns everyday crackers and pudding into a magnificent chilled masterpiece, making it an essential tool for busy parents and beginner cooks alike. Do not feel rushed during the chilling process, as letting the cake rest patiently inside your refrigerator is the absolute secret to achieving that perfect, tender slice that holds its shape beautifully on a dessert plate. Gather your mixing bowls, whisk your cream with love, and enjoy the effortless process of assembling this beautiful cloud of chocolate happiness today.
Nutrition Details
Here is a clear breakdown of the estimated nutritional content for this classic no bake recipe. The numbers represent the values for one individual square slice when the entire rectangular cake is divided into twelve equal portions.
| Nutrient Type | Amount Per Serving | Percentage of Daily Value |
| Total Calories | 295 calories | 15 percent |
| Protein Content | 4.5 grams | 9 percent |
| Total Carbohydrates | 44 grams | 15 percent |
| Dietary Fiber | 1.2 grams | 5 percent |
| Total Fat | 12 grams | 15 percent |
| Sugars | 28 grams | 28 percent |
| Cholesterol | 22 milligrams | 7 percent |
| Calcium | 90 milligrams | 7 percent |
Disclaimer
Please keep in mind that every human body is completely unique and individual health results may change depending on your personal metabolism, daily activity levels, and overall nutritional choices. The health and nutritional data provided in this article is an estimate calculated using standard food ingredient databases and could vary slightly depending on the specific brands of graham crackers or whipped toppings you purchase at your local market. It is always a wise and healthy idea to consult with a qualified primary care physician or a registered dietitian before making significant changes to your personal eating patterns or lifestyle routine.
The Fascinating History of Icebox Cakes
To truly appreciate the brilliant design of this no bake eclair cake, it is wonderful to look back at the historical origin of icebox desserts, which first gained massive popularity across America during the nineteen twenties and nineteen thirties. As mechanical refrigerators, then widely known as iceboxes, became standard appliances in modern family kitchens, commercial food companies began looking for creative ways to promote these new cooling machines to home cooks.
Baking companies started printing simple recipes on the backs of cookie boxes, demonstrating how simple biscuits could be layered with sweetened heavy cream and left inside the cold machine to transform into a soft cake texturally. This clever kitchen shortcut revolutionized home entertaining because it allowed busy hosts to prepare elegant, sliceable desserts days in advance without enduring the intense summer heat of traditional wood burning ovens, establishing a timeless tradition of stress free dessert making that remains highly popular today.
Choosing the Best Crackers for Structure
While traditional honey graham crackers are the standard foundation for this recipe because their rectangular shape fits perfectly inside baking pans, the specific brand and style you choose can alter the final outcome of your cake texturally. Always opt for crisp, standard graham crackers rather than soft or low fat varieties, because low fat crackers tend to dissolve too quickly into a mushy paste when exposed to the moisture of the vanilla pudding layer.
If you live in a region of the world where traditional graham crackers are difficult to find at your local market, you can easily substitute them with classic British digestive biscuits, rich tea biscuits, or sweet French petit beurre cookies. These alternative biscuits possess a similar density and structural integrity, meaning they will absorb the pudding cream at a matching rate and soften into that signature tender pastry texture beautifully.
The Role of Whipped Topping in Stabilization
Many beginner cooks wonder if they can replace the frozen whipped topping with fresh heavy whipping cream beaten with sugar from scratch. While fresh whipped cream delivers an exceptionally pure dairy flavor, it lacks the specialized food stabilizers found in commercial whipped toppings, which can cause your cake layers to break down and become watery after twenty four hours in the fridge.
The stabilized nature of commercial whipped topping ensures that your vanilla pudding mixture remains fluffy, airy, and firm over several days of storage, allowing you to cut clean, sharp vertical square slices that look beautiful on a plate. If you are determined to use fresh heavy cream from scratch, you must add a teaspoon of unflavored gelatin or a specialized whipping cream stabilizer to the liquid while beating it to guarantee your cake maintains its beautiful structure over time.
Creative Presentation Variations for Parties
Once you have mastered the basic rectangular assembly method described above, you can explore creative presentation variations to turn this humble comfort food into a dramatic visual showpiece for elegant dinner parties. Try assembling the ingredients inside a clear glass trifle bowl instead of a flat baking dish, alternating multiple thin layers of crackers, pudding, and chocolate glaze all the way to the top rim.
The transparent glass bowl displays the beautiful alternating horizontal lines of cream and dark chocolate perfectly, making it a stunning centerpiece that will instantly capture the attention of your guests as they walk into your dining room. Another fun option for children parties is to assemble the ingredients inside small, individual clear plastic cups, creating personalized mini eclair cakes that require absolutely no slicing or serving utensils during the busy event.
Preventing Your Chocolate Glaze from Cracking
A common issue that home cooks sometimes face when making glazed desserts is watching the beautiful top chocolate layer crack into jagged, messy pieces as soon as a sharp knife presses down to slice the cake. This stiffness occurs when the glaze sugar crystallizes too densely during the long cooling process inside the refrigerator cavity.
To prevent this aesthetic issue and ensure smooth, clean cuts every single time, always make sure your unsalted butter is completely integrated into the hot cocoa liquid before pouring it over the cake surface. The natural lipids in the butter wrap around the sugar molecules, creating a flexible, velvety chocolate shield that remains soft enough to yield cleanly to the pressure of a knife blade while still maintaining its gorgeous shiny appearance.
Proper Slicing Techniques for Beautiful Layers
To showcase the gorgeous interior layers of your chocolate eclair cake when serving it to guests, utilizing the proper slicing technique is just as important as the assembly process itself. Always ensure the cake has chilled for the full recommended eight hours so that the graham crackers have reached maximum tenderness before you attempt to make your first cut.
Grab a long, sharp chef knife and a clean kitchen towel or a piece of paper towel before you begin. Slide the knife straight down through all the layers in one smooth motion, wipe the blade completely clean with your towel, and then dip the metal into a cup of warm water before making your next cut. Cleaning and warming the blade between every single slice prevents the white vanilla cream from smudging upward into the dark chocolate glaze, keeping your presentation remarkably sharp and professional.