 Skip to content
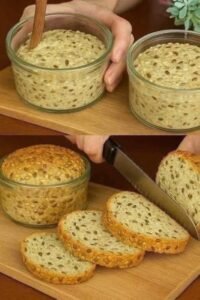
Introduction
Making your own bread at home is one of the most rewarding things you can do in your kitchen because it fills your house with a smell that feels like a warm hug. This specific recipe for no knead seed bread is a total game changer for anyone who thinks that baking is too hard or requires too much equipment. Most people imagine that they need to spend hours pushing and pulling dough until their arms get tired but this method uses the power of time to do all that work for you. By mixing the ingredients and letting them sit quietly on your counter the flour and water work together to create a perfect texture without any physical effort from you at all. It is a beautiful process that feels like a science experiment where simple pantry staples transform into a crusty and delicious loaf of art. You do not need a fancy mixer or a bread machine to get professional results that look like they came from a high end bakery in the city. This recipe is all about going back to the basics and enjoying the slow pace of traditional baking while still fitting into a busy modern life. It is the perfect starting point for beginners who want to feel the pride of slicing into a loaf they made with their own two hands.
People absolutely love this bread because it offers a level of crunch and flavor that you simply cannot find in a plastic bag at the local grocery store. The addition of various seeds creates a complex profile that makes every single bite interesting and full of different textures that keep your taste buds happy. There is something deeply satisfying about hearing the crackle of a fresh crust as it comes out of the oven and knowing that you are about to eat something healthy and pure. Many people find that baking this bread becomes a form of therapy because it requires you to slow down and wait for nature to take its course during the rising process. It is a very forgiving recipe which means that even if you are not exact with every single movement the bread will still turn out wonderful and tasty. The love for this bread also comes from its honesty because you know exactly what is inside of it without any weird chemicals or preservatives that keep store bought bread soft for weeks. It is a rustic and chunky loaf that looks beautiful on a wooden cutting board and makes everyone who sees it want to grab a piece immediately. When you share this bread with friends or family they will think you have spent years practicing your skills as a master baker even though it was incredibly easy to put together.
You should make this bread whenever you feel like you need a boost of comfort or when you want to impress your guests at a dinner party without spending all day in the kitchen. It is the perfect companion for a big bowl of hot soup on a rainy afternoon or for making the best avocado toast you have ever tasted on a sunny Sunday morning. For those who are focused on fitness and health this recipe is a treasure because it is packed with protein and healthy fats from the seeds which give you long lasting energy. The fiber content in this bread is much higher than regular white bread which helps you feel full and satisfied for a much longer time after eating. Many people choose to bake this when they want to take control of their diet and avoid the hidden sugars and salts found in commercial bakery products. There is also an emotional reason to bake this bread because the act of creating food from scratch connects you to your home and your family in a very special way. It makes a wonderful gift for a neighbor who is feeling down or a friend who just moved into a new house because a homemade loaf says that you care. Whether you are eating it for health reasons or just because you love the taste of toasted seeds this recipe will quickly become a favorite part of your weekly routine.
The beauty of this no knead seed bread is that it fits into almost any lifestyle because the actual active work time is only about ten minutes of your entire day. You can mix the dough before you go to work and let it rise while you are busy or you can set it up before you go to bed and bake it fresh in the morning. This flexibility is why so many people have switched from buying bread to making it themselves because it removes the stress of timing everything perfectly. Beginners often feel scared of yeast but this recipe is designed to be foolproof so you can gain confidence with every loaf you bake. You will find that the crust is thick and golden while the inside remains soft and airy with little pockets of steam that formed during the long rest. Adding seeds like sunflower and pumpkin not only makes the bread look like it belongs in a magazine but also adds a rich nuttiness that pairs perfectly with butter or honey. Once you try this method you will realize that great bread does not have to be a mystery or a difficult chore that only experts can handle. It is a simple joy that belongs in every home and this recipe is your golden ticket to becoming the baker you always wanted to be. You are about to discover how easy it is to create something truly special using just a few basic ingredients and a little bit of patience.
Ingredients You Will Need
To make this delicious loaf you will need to gather a few simple things from your pantry and the store. Make sure your measurements are as accurate as possible for the best results.
-
3 cups of all purpose flour or bread flour
-
1 and a half cups of warm water that feels like bath water
-
1 teaspoon of active dry yeast or instant yeast
-
1 and a half teaspoons of fine sea salt
-
2 tablespoons of honey or maple syrup for a tiny bit of sweetness
-
half a cup of raw sunflower seeds
-
half a cup of raw pumpkin seeds
-
2 tablespoons of flax seeds
-
2 tablespoons of sesame seeds
-
1 tablespoon of chia seeds
-
Extra seeds for sprinkling on top of the loaf before baking
Step by Step Method
Preparing the Dry Mix
The first thing you need to do is find a very large mixing bowl because the dough will grow quite a bit as it sits. Pour your three cups of flour into the bowl and add the salt and the yeast. It is important to make sure your yeast is fresh because old yeast might not make the bread rise properly. Use a whisk or a large spoon to stir these dry ingredients together until they are well combined. Now you can add all your wonderful seeds into the flour mixture. Stir the sunflower seeds and pumpkin seeds and flax seeds and sesame seeds and chia seeds until they are evenly spread throughout the flour. This ensures that every slice of bread you cut later will be full of crunchy surprises.
Adding the Liquids
Once your dry ingredients are ready you can prepare the water. Make sure the water is warm but not hot because hot water can kill the yeast and cold water will make it take too long to rise. Stir your honey or maple syrup into the warm water until it dissolves completely. Now make a small well in the center of your flour and seed mixture and pour the water inside. Use a sturdy wooden spoon or even your clean hands to mix everything together. You are not trying to make a smooth dough like you see in professional videos. You just want to make sure all the flour is wet and there are no dry spots left at the bottom of the bowl. The dough will look very shaggy and sticky and messy but that is exactly how it should look at this stage.
The Long Rest
Cover your bowl tightly with plastic wrap or a clean damp kitchen towel. This is the part where the magic happens and you do not have to do anything at all. Place the bowl in a warm spot in your kitchen where it will not be disturbed. You need to let this dough sit for at least eight hours but twelve to eighteen hours is even better for the flavor. During this time the yeast will eat the sugars in the flour and create tiny bubbles of gas which makes the bread rise. The long wait also allows the gluten to strengthen itself so you do not have to knead it. If you look at the bowl after a few hours you will see that the dough has doubled in size and is covered in little bubbles on the surface.
Shaping the Dough
After the long rest is over your dough will be very bubbly and still quite sticky. Sprinkle a good amount of flour onto a clean counter or a piece of parchment paper. Gently tip the dough out of the bowl onto the floured surface. Do not pull it too hard because you want to keep those lovely air bubbles inside. Fold the edges of the dough toward the center a few times just to form a rough ball shape. You are not kneading it just tucking it into a round pile. If it sticks to your fingers just add a little more flour to your hands. Once it looks like a ball cover it with your towel again and let it rest for about thirty minutes while you get the oven ready.
Heating the Oven
While your dough is having its final rest you need to get your oven very hot. Place a heavy pot with a lid like a Dutch oven or a ceramic pot inside the oven. Turn the oven to 450 degrees Fahrenheit and let the pot heat up for at least thirty minutes. Having a very hot pot is the secret to getting that professional crispy crust because it creates steam as soon as the dough hits the bottom. Be very careful during this step because the pot will be extremely hot and you must use thick oven mitts to handle it.
Baking the Bread
Once the pot is hot and the dough has rested carefully take the pot out of the oven and remove the lid. Pick up your dough using the parchment paper or very carefully drop it into the hot pot. If you want it to look extra pretty you can take a sharp knife and make a small cut across the top of the dough. Sprinkle a few extra seeds on top for decoration. Put the lid back on the pot and slide it into the oven. Bake it with the lid on for thirty minutes. The lid traps the steam which allows the bread to expand and stay soft while the crust starts to form.
The Final Crunch
After the thirty minutes are up remove the lid from the pot. You will see that the bread has puffed up and looks pale golden. Now you need to bake it for another fifteen to twenty minutes without the lid. This is when the crust turns deep brown and becomes very crunchy and the seeds on top get toasted and fragrant. Keep an eye on it to make sure it does not get too dark but do not be afraid of a little bit of color because that is where all the flavor lives. Once the bread sounds hollow when you tap on the bottom it is finished.
Cooling Down
This is the hardest part of the entire process because the bread will smell amazing but you must wait. Take the bread out of the pot and place it on a wire cooling rack. If you cut into the bread while it is still steaming hot the inside will be gummy and wet because the middle is actually still finishing its cooking process with the leftover heat. Let it cool for at least one hour until it is room temperature. This patience will be rewarded with a perfect texture and a beautiful crumb that holds its shape when you slice it for your sandwiches or toast.
Why This Recipe Is Special
This no knead seed bread recipe is special because it takes a traditional craft and makes it accessible to everyone regardless of their kitchen skills. In a world where we are always rushing this bread teaches us the value of waiting for something good. The nutritional value is another reason why this recipe stands out among others. Each seed you add brings something unique to the table like the magnesium in pumpkin seeds or the healthy fats in flax seeds. When you eat this bread you are fueling your body with real ingredients that provide steady energy instead of a quick sugar crash. It is also a very sustainable way to eat because you can buy your flour and seeds in bulk which reduces packaging waste and saves you a lot of money over time.
The texture of this bread is something you can rarely find in a store because it has a thick and chewy crust that provides a great contrast to the soft center. The seeds get toasted during the baking process which releases their natural oils and makes the whole loaf taste like roasted nuts. Because there are no preservatives this bread is much easier on your stomach and many people find they feel better when they eat homemade sourdough or long ferment breads. It is also special because it is a blank canvas for your creativity. You can change the seeds or add herbs if you want to experiment but the base recipe will always work perfectly. It is a reliable friend in the kitchen that gives you a sense of accomplishment every time you pull a golden loaf out of the oven. This recipe builds a bridge between the old ways of making food and our busy modern lives showing that we do not have to sacrifice quality for convenience.
Extra Tips for Better Taste
If you want to take your no knead seed bread to the next level you can try toasting your seeds in a dry pan for a few minutes before adding them to the flour. This brings out a much deeper flavor and makes the seeds even crunchier inside the soft bread. Another great tip is to use filtered water if your tap water has a strong smell of chlorine because the yeast is very sensitive to chemicals and will grow better in clean water. You can also experiment with different types of flour like adding a half cup of whole wheat flour or rye flour to give the bread a more rustic and earthy taste. If you like a more sour flavor you can let the dough rise in the refrigerator for two days instead of on the counter for one day. This slow cold fermentation creates a flavor that is very similar to traditional sourdough without the need for a starter.
For an extra shiny and dark crust you can spray a little bit of water into the oven right when you put the pot inside. The extra moisture helps the crust become even more crackly and beautiful. If you find that the bottom of your bread is getting too dark before the top is finished you can place a cookie sheet on the rack below your pot to help block some of the direct heat. Always make sure to use a sharp serrated knife when you are ready to slice the bread so you do not squish the soft middle. If you have leftovers you can slice the entire loaf and freeze it so you can have a piece of fresh tasting seed bread whenever you want by just putting a slice in the toaster. Adding a teaspoon of caraway seeds or a bit of rosemary can also change the entire personality of the bread making it perfect for savory meals.
Final Thoughts
Baking your own no knead seed bread is a journey that starts with a simple bowl and ends with a masterpiece that you can be proud to share. It is a reminder that some of the best things in life take time and that we do not always need to work hard to get a great result. This recipe is meant to be a joyful experience that brings warmth to your home and health to your body with every bite. I hope you enjoy the process of watching your dough grow and the wonderful smell that will fill your kitchen as the seeds begin to toast. Remember that every loaf is a new chance to learn and even if your first one is not perfect it will still be the best bread you have ever eaten because you made it yourself. Keep practicing and keep sharing the love of homemade bread with everyone you know.
Nutrition Details
Here is a general idea of what you will find in this bread based on a standard loaf cut into twelve thick slices. Please remember these are estimates and can change depending on the specific brands of ingredients you choose to use.
| Nutrient | Amount Per Serving (1 Slice) |
| Calories | 195 calories |
| Total Fat | 7 grams |
| Saturated Fat | 1 gram |
| Sodium | 290 milligrams |
| Total Carbohydrates | 28 grams |
| Dietary Fiber | 4 grams |
| Sugars | 2 grams |
| Protein | 6 grams |
| Calcium | 4 percent of daily value |
| Iron | 10 percent of daily value |