 Skip to content
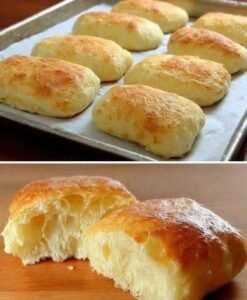
If you are looking for a simple way to bake at home without any stress or expensive ingredients then you have found the perfect place today because this guide will show you exactly how to make the most amazing bread rolls ever. Most people feel very scared when they think about baking bread because they imagine hours of hard work and tired arms from all the heavy kneading but this specific recipe changes everything for you in the best possible way. This bread is special because it does not require any eggs or any butter or any milk which makes it a very budget friendly option for families who want to save money while still enjoying fresh food. You do not need to be an expert chef or have fancy kitchen tools to get a great result because the process is designed to be easy for absolute beginners who might be picking up flour for the very first time. By the time you finish reading this article you will feel confident enough to go into your kitchen and start mixing your dough because you will realize that making fresh bread is actually one of the most relaxing things you can do during your weekend.
The reason why so many people fall in love with this recipe is because it produces a texture that is incredibly soft and fluffy despite having very simple ingredients that you probably already have in your pantry right now. Many dairy free recipes can end up being dry or hard but this no knead method uses a higher moisture content to ensure that every single bite stays moist and delicious for a long time. It is truly wonderful to see how water and flour and a little bit of yeast can transform into a golden brown treat that smells like a professional bakery is located right inside your own house. Since there is no kneading involved you are basically letting the tiny bubbles of air do all the hard work for you while you sit back and relax or work on other things around the house. This hands off approach is the secret to getting that light and airy crumb that everyone loves in a dinner roll because it prevents the dough from becoming too tough or dense during the preparation phase.
Making these rolls is a great choice for many different occasions whether you are hosting a big holiday dinner with your extended family or just want a cozy snack to go along with a warm bowl of soup on a rainy Tuesday evening. There is a deep emotional connection that comes with baking bread because the smell fills your home with a sense of comfort and safety and warmth that is hard to find in store bought food items. If you have children they will love helping you mix the sticky dough and watching it grow bigger in the bowl as the yeast works its magic which makes for a very fun and educational kitchen activity. Many people also choose this recipe for fitness reasons because it allows you to control exactly what goes into your body without any hidden preservatives or strange chemicals that are often found in commercial bread brands. You get to enjoy the pure taste of toasted grains and a hint of sweetness without worrying about extra fats from butter or eggs which makes it feel much lighter on your stomach.
You should definitely try this recipe if you are tired of spending too much money at the grocery store on fancy artisan breads that go stale in just one or two days after you bring them home. This homemade version stays fresh for longer and you can even freeze the rolls after they cool down so you always have a quick addition to your meals whenever you are in a big hurry. The simplicity of the ingredients means that even if you have a very tight budget you can still provide a high quality and nutritious side dish for your friends and loved ones. It is a very empowering feeling to know that you can create something so beautiful and tasty starting with just a few basic staples from your cupboard. Once you see how easy it is to skip the kneading process you might never go back to buying pre packaged rolls again because the flavor and the texture of home baked goods are simply on a different level. Let us get started with the list of things you need so you can begin your baking journey today with total confidence and excitement for the tasty results waiting for at the end.
Ingredients You Will Need
To make these soft and fluffy rolls you will need to gather the following items from your kitchen. Please make sure your yeast is fresh so that your bread rises perfectly.
-
Warm Water: 2 cups (Ensure it is warm to the touch but not boiling hot)
-
Active Dry Yeast: 2 and 1 quarter teaspoons (This is usually 1 standard small packet)
-
Granulated Sugar: 3 tablespoons (This helps the yeast grow and adds a nice flavor)
-
Salt: 1 and a half teaspoons (To bring out the savory taste of the flour)
-
Vegetable Oil: 4 tablespoons (Any neutral oil like canola or sunflower works great)
-
All Purpose Flour: 4 and a half cups (You might need a tiny bit more for dusting your hands)
-
Olive Oil: 1 tablespoon (This is just for greasing the bowl)
Step by Step Method
Step 1: Prepare the Yeast Mixture
Start by taking a large mixing bowl and pouring in your warm water. It is very important that the water is not too hot because high temperatures can kill the yeast. Add your sugar and your yeast into the water and give it a very gentle stir. Let this mixture sit for about ten minutes until you see a layer of foam forming on the top. This foam means your yeast is alive and ready to make your bread rise.
Step 2: Add the Liquid Ingredients
Once your yeast is nice and bubbly you can pour in the vegetable oil. Stir it gently to combine. The oil is what replaces the butter in this recipe and it helps keep the bread soft for several days.
Step 3: Mix in the Dry Ingredients
Add your salt to the bowl and then start adding your flour one cup at a time. Use a large wooden spoon or a sturdy spatula to mix the flour into the liquid. Since this is a no knead recipe you do not need to use your hands yet. Just keep stirring until all the flour is wet and you have a sticky shaggy dough. It will look a bit messy but that is perfectly normal for this type of bread.
Step 4: The First Rise
Lightly grease another clean bowl with a little bit of olive oil. Move your sticky dough into this greased bowl and cover it with a clean kitchen towel or some plastic wrap. Place the bowl in a warm spot in your house where there are no cold drafts. Let the dough rest and rise for about one and a half hours or until it has doubled in size.
Step 5: Shape the Rolls
After the dough has grown big and puffy gently press it down to let the air out. Lightly flour your hands and your work surface so the dough does not stick. Divide the dough into twelve or fifteen equal pieces. Roll each piece into a smooth ball using the palms of your hands.
Step 6: The Second Rise
Place your shaped dough balls onto a baking tray lined with parchment paper. Space them out so they have room to grow. Cover them again with your towel and let them rise for another forty five minutes. This second rise is the secret to getting that fluffy cloud like texture.
Step 7: Bake the Bread
While the rolls are rising for the second time heat your oven to 375 degrees Fahrenheit. Once the rolls look big and soft put them in the oven. Bake them for about twenty to twenty five minutes until the tops are a beautiful golden brown color.
Step 8: Cooling Down
Take the tray out of the oven and let the rolls cool on a wire rack. If you want them to be extra soft you can brush the tops with a little bit of oil while they are still hot. Wait at least ten minutes before eating so the inside finishes setting properly.
Why This Recipe Is Special
This recipe is truly a gem for anyone who wants to eat healthy on a budget. Because it uses no eggs and no dairy it is naturally vegan and much lower in saturated fat than traditional brioche or dinner rolls. It is special because it proves that you do not need expensive animal products to create a high quality meal. The no knead method is also very gentle on the gluten which results in a crumb that is soft rather than chewy. This makes it very easy for children and elderly people to enjoy. Additionally since you are making it at home you can be sure there are no artificial colors or high fructose corn syrup in your food. It is honest bread made with honest ingredients and that is something you can feel proud of serving to your guests.
Extra Tips for Better Taste
If you want to take your bread rolls to the next level you can try a few creative additions. Before baking you can sprinkle the tops with some sesame seeds or poppy seeds for a nice crunch. If you like savory flavors you can mix a teaspoon of garlic powder or dried rosemary into the flour before you add the water. For a sweeter version you can add a little bit more sugar and some cinnamon to the dough. Another great tip is to use a spray bottle to lightly mist the inside of the oven with water right when you put the rolls in because the steam helps create a slightly crispier crust while keeping the inside very tender. Always store your leftover rolls in an airtight bag to keep them from drying out in the air.
Final Thoughts
Baking your own bread is a journey that brings a lot of joy and satisfaction to your daily life. This no knead dairy free recipe is designed to take away the stress of baking and replace it with a sense of accomplishment. Whether you eat these rolls plain or use them to make small sandwiches you will notice the difference that fresh ingredients make. We hope you enjoy the process of watching your dough rise and the wonderful aroma that will fill your home very soon. Happy baking to you and your family.
Nutrition Details
Below is the estimated nutrition information for one serving of these bread rolls based on the recipe making fifteen individual rolls.
| Nutrient | Amount Per Serving |
| Calories | 165 kcal |
| Total Fat | 4g |
| Saturated Fat | 0.5g |
| Cholesterol | 0mg |
| Sodium | 230mg |
| Total Carbohydrates | 28g |
| Dietary Fiber | 1g |
| Sugars | 2.5g |
| Protein | 4g |
Disclaimer
Please remember that every person has a different body and different health needs. The nutritional values provided here are estimates and might change based on the specific brands of ingredients you choose to use in your kitchen. If you have specific allergies or medical conditions always consult with a professional doctor or a certified nutritionist before making big changes to your diet. The results of this baking recipe can also vary depending on your local climate and the altitude of your home or the accuracy of your oven temperature.