 Skip to content
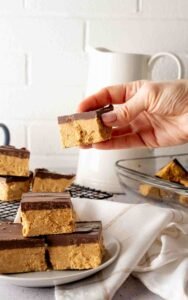
Introduction
The world of homemade treats is vast and exciting but few things compare to the simple joy of making no bake peanut butter bars. This recipe is all about creating a rich and satisfying dessert without ever having to turn on your oven or deal with the heat of a stove for a long time. These bars are a wonderful combination of a thick and creamy peanut butter base mixed with crunchy crumbs and topped with a smooth layer of melted chocolate that snaps when you bite into it. When you think about the perfect snack you probably want something that is sweet but also has a little bit of saltiness to balance it out and that is exactly what these bars provide every single time. They are often called a homemade version of a famous candy bar but they actually taste much fresher and more authentic because you get to choose the quality of the ingredients yourself. Making these treats is a great way to introduce beginners to the kitchen because the process is very forgiving and does not require any special skills or fancy equipment like electric mixers or heavy duty baking pans. You just need a bowl and a spoon and a little bit of patience while they set in the fridge to become the perfect texture for slicing.
People absolutely love these peanut butter bars because they offer a level of convenience that most baked goods simply cannot match in a busy world. In a life where everyone is rushing around it is hard to find time to wait for an oven to preheat or to worry about a cake rising or cookies burning on the bottom. These bars take away all that stress because they rely on the natural cooling process of the refrigerator to bring everything together into a solid and delicious shape. Another reason they are so popular is that they use common pantry staples that almost everyone already has in their kitchen cupboards right now. You do not need to go out and buy expensive or rare items like vanilla beans or special flours to make something that tastes like it came from a professional bakery. The texture is also a huge selling point because it is soft and chewy while still being firm enough to hold in your hand without falling apart into a mess. Kids love them because they are sweet and easy to eat and adults love them because they provide a sense of nostalgia that reminds them of childhood school lunches or family gatherings where simple treats were always the star of the show.
You might wonder when is the best time to make these bars or why you should choose them over a different type of dessert and the answer is that they fit into almost every occasion. If you are feeling a bit down and need a boost of comfort then the heavy presence of peanut butter and chocolate can really lift your spirits and make your afternoon feel much brighter. From an emotional perspective these bars represent care and simplicity which makes them a great gift for a neighbor or a friend who is going through a hard time. If you are a person who loves fitness and staying active you can even adjust this recipe to be a high protein snack that gives you energy before a long run or a workout at the gym. The healthy fats from the peanuts provide a slow release of energy that keeps you feeling full and satisfied for much longer than a sugary candy bar from a vending machine would. They are also the perfect solution for summer parties or outdoor picnics where you do not want to heat up your house by using the oven during a hot day. Everyone at the party will be impressed by the beautiful layers and the rich flavor and they will be shocked to learn that it only took you a few minutes of actual work to put it all together.
The taste of these bars is a masterclass in how different flavors can work together to create something better than the sum of its parts. You have the earthy and nutty notes from the peanut butter which provide a deep base layer of flavor that is not too overwhelming. Then you have the sweetness from the sugar which brightens up the whole experience and makes it feel like a true dessert. The addition of graham cracker crumbs adds a toasted and honey like flavor while also providing a structural foundation that gives the bars a satisfying bite. On top of all that is the chocolate layer which adds a touch of bitterness and a creamy mouthfeel that ties everything together into a perfect package. Whether you are making these for a birthday or a holiday or just because it is a Tuesday and you want something yummy you will find that they are always a hit. They store well in the fridge for days which means you can make a big batch on Sunday and have a little treat waiting for you every single night of the week. There is something very grounding about knowing you have a homemade snack ready to go whenever a craving hits and this recipe is the most reliable way to achieve that feeling of kitchen success.
Ingredients You Will Need
To make these delicious bars you will need to gather a few simple items from your kitchen. Make sure you measure them carefully so the texture comes out exactly right.
-
One cup of unsalted butter which should be melted and slightly cooled.
-
Two cups of graham cracker crumbs which you can buy pre crushed or crush yourself.
-
Two cups of powdered sugar which is also known as confectioners sugar for a smooth texture.
-
One cup and a half of creamy peanut butter for the base layer of the bars.
-
One teaspoon of pure vanilla extract to add a nice aroma and depth.
-
One and a half cups of semi sweet chocolate chips for the top layer.
-
Two tablespoons of creamy peanut butter which will be mixed with the chocolate.
-
A pinch of salt if you are using unsalted peanut butter to help bring out the flavors.
Step by Step Method
Preparing Your Baking Pan
The first thing you need to do is prepare the space where your bars will live. Take a square baking pan that is about nine inches by nine inches in size. Line the inside of the pan with parchment paper or aluminum foil. Make sure the paper hangs over the edges a little bit so you can use it as handles to lift the bars out later. If you do not have paper you can grease the pan with a little bit of butter but the paper makes the process much cleaner and easier when it comes time to slice them.
Mixing the Base Layer
In a large mixing bowl you will want to combine the melted butter and the graham cracker crumbs. Use a large spoon or a spatula to stir them together until the crumbs are all wet and look like damp sand. Next you will add the powdered sugar and the one and a half cups of creamy peanut butter along with the vanilla extract. Keep stirring this mixture until it is very smooth and everything is fully combined. It might take a little bit of muscle because the mixture will become quite thick and heavy as the sugar and peanut butter blend together.
Pressing the Base into the Pan
Once your peanut butter mixture is ready you should transfer it into your prepared baking pan. Use the back of your spoon or a flat spatula to press the mixture down firmly into an even layer. You want to make sure it reaches all the corners and is the same thickness across the whole pan. If you find the mixture is sticking to your spoon you can use a piece of wax paper to press it down with your hands. The firmer you press the base the better the bars will hold together once they are chilled.
Melting the Chocolate Topping
Now it is time to create the beautiful chocolate top. Take a small bowl that is safe to use in the microwave. Put your semi sweet chocolate chips and the extra two tablespoons of peanut butter into the bowl. Heat the mixture in the microwave for thirty seconds and then take it out to stir. Continue heating it in short bursts of fifteen seconds and stirring in between until the chocolate is completely melted and looks very shiny. Adding that little bit of peanut butter to the chocolate is a secret trick because it keeps the chocolate from getting too hard which prevents it from cracking when you try to cut the bars later.
Adding the Final Layer
Pour the melted chocolate mixture over the top of the peanut butter base in the pan. Use a knife or a spatula to spread the chocolate out so it covers the entire surface. You can tilt the pan back and forth to help the chocolate flow into the corners for a perfectly smooth finish. If you want to be fancy you can even tap the pan on the counter a few times to get rid of any air bubbles that might be hiding in the chocolate.
The Chilling Process
This is the hardest part of the recipe because you have to wait. Place the pan in the refrigerator and let it sit for at least two hours. If you can wait even longer like four hours or even overnight the bars will be much easier to cut and the flavors will have more time to meld together. The cold temperature allows the butter and the chocolate to solidify which creates that perfect bite that is firm but still melts in your mouth.
Slicing and Serving
When the bars are cold and firm use the overhanging parchment paper to lift the entire block out of the pan and place it on a cutting board. Use a sharp knife to cut the block into small squares or rectangles. To get very clean cuts you can dip your knife in hot water and wipe it dry between every single slice. This melts the chocolate just enough to let the knife slide through without sticking. Serve them immediately or put them back in the fridge until you are ready to eat.
Why This Recipe Is Special
This recipe is special because it bridges the gap between a simple snack and a gourmet treat without requiring any advanced culinary knowledge. One of the main benefits is the texture which is a perfect harmony of the sandy crunch from the graham crackers and the velvet smoothness of the melted chocolate. It is a sensory experience that satisfies multiple cravings at once which is why it is often the first thing to disappear at any potluck or office party. Unlike many other desserts that can be very temperamental these bars are extremely sturdy and can survive being transported in a container without losing their shape or flavor.
From a health perspective while these are definitely a treat they do offer some benefits over traditional sugary snacks. Peanut butter is a great source of healthy monounsaturated fats which are good for your heart and help you feel full. It also contains protein which helps with muscle repair and provides a more stable form of energy compared to simple sugars alone. If you use a dark chocolate for the topping you also get a boost of antioxidants which are known to help the body fight off stress. This makes the bars a slightly better choice when you want something sweet but also want a little bit of nutritional value to go along with it.
Another reason this recipe stands out is its versatility for different diets. It is very easy to make these bars gluten free by simply choosing gluten free graham crackers which are now widely available in most grocery stores. You can also make them vegan by using a plant based butter and dairy free chocolate chips. Because there are no eggs or flour involved you do not have to worry about the science of baking which means you can swap ingredients more freely without ruining the final result. It is a truly inclusive recipe that can be enjoyed by almost anyone regardless of their dietary needs or cooking experience.
Extra Tips for Better Taste
If you want to take your peanut butter bars to the next level there are several creative things you can try to improve the taste and presentation. First consider the type of peanut butter you use. While standard creamy peanut butter works best for a smooth texture using a natural style peanut butter can add a more intense peanut flavor. Just make sure to stir the natural peanut butter very well before measuring so the oils are fully incorporated. You can also try using crunchy peanut butter if you want even more texture in every bite which adds a nice surprise as people eat them.
Another great tip is to play with the salt levels. A tiny sprinkle of flaky sea salt on top of the chocolate layer right before it sets can transform these bars into a sophisticated dessert. The salt helps to cut through the richness of the sugar and makes the chocolate taste even deeper. You can also experiment with the type of chocolate you use for the topping. Some people prefer milk chocolate for a sweeter and creamier taste while others love the intensity of dark chocolate which provides a more grown up flavor profile. You could even swirl white chocolate and dark chocolate together to create a beautiful marbled effect on the top of your bars.
If you want to add some extra crunch you could mix in some chopped peanuts or even some pretzel bits into the base layer. The pretzels add a wonderful salty element that pairs perfectly with the sweet components. For those who love a bit of spice a tiny pinch of cinnamon mixed into the graham cracker crumbs can add a warm and cozy flavor that makes the bars feel perfect for the autumn season. Finally always make sure your powdered sugar is sifted if it looks lumpy. Lumps of sugar in the base can be unpleasant to bite into so taking an extra minute to ensure a smooth powder will result in a much better mouthfeel for your guests.
Final Thoughts
Making these no bake peanut butter bars is a journey into the world of simple and effective cooking that yields high rewards for very little effort. It is a recipe that reminds us that food does not have to be complicated to be absolutely delicious and that some of the best memories are made over a shared tray of homemade treats. Whether you are a seasoned pro in the kitchen or someone who is just starting out these bars will give you a sense of pride and a very happy stomach. They are a timeless classic for a reason and once you make them for the first time you will likely find yourself coming back to this recipe again and again. Do not be afraid to make them your own by adding your favorite toppings or switching up the ingredients to suit your mood. The most important thing is to enjoy the process and the wonderful flavors that come from combining the simple magic of peanut butter and chocolate.
Nutrition Details
Knowing what is in your food is important for maintaining a balanced lifestyle. Below is a general guide for the nutritional content of these bars based on a single serving size. Please keep in mind that these numbers can change depending on the specific brands of ingredients you choose to buy at the store.
| Nutrient | Amount Per Serving |
| Calories | 280 calories |
| Total Fat | 18 grams |
| Saturated Fat | 9 grams |
| Cholesterol | 15 milligrams |
| Sodium | 190 milligrams |
| Total Carbohydrates | 26 grams |
| Dietary Fiber | 2 grams |
| Sugars | 18 grams |
| Protein | 5 grams |
| Vitamin D | 0 percent |
| Calcium | 2 percent |
| Iron | 6 percent |
| Potassium | 4 percent |