 Skip to content
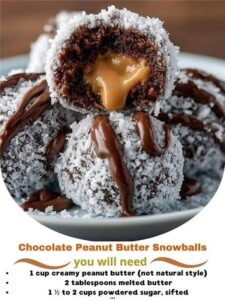
Introduction
Imagine a tiny treat that feels like a bite of heaven sitting right in the palm of your hand. That is exactly what you get when you make these amazing chocolate peanut butter snowballs. This recipe is a beautiful mix of rich cocoa and creamy nut butter that satisfies every single sweet craving you might have. It is not just a candy or a simple snack because it represents the perfect balance of two of the most famous flavors in the entire world. When you hold one of these little balls you can feel the smooth texture and see the deep color of the chocolate coating. Many people call them truffles or buckeyes but the name snowball makes them feel even more magical and special for any time of the year. You do not need a lot of fancy equipment or a high level of skill in the kitchen to create something that looks like it belongs in a professional bakery shop window. The simplicity of this recipe is what makes it so wonderful for families and busy people who want something delicious without spending hours over a hot stove or waiting for a long time.
People absolutely love this recipe because it brings a sense of comfort and joy that few other foods can match. There is a deep biological reason why we enjoy the combination of salt from the peanut butter and the sweetness from the sugar and chocolate. It creates a flavor profile that keeps your taste buds excited with every single bite you take. These snowballs are also loved because they are very easy to share with friends and family during gatherings or quiet nights at home. You can pile them up on a plate and watch them disappear in just a few minutes because nobody can stop at eating only one. They are small enough to be a light snack but rich enough to feel like a very indulgent dessert. For many of us these treats remind us of our childhood and the times we spent in the kitchen with our parents or grandparents making holiday cookies. That emotional connection makes the food taste even better because it is filled with happy memories and the love of home cooking that you just cannot get from a store bought box of candy.
You should make these chocolate peanut butter snowballs whenever you want to brighten someone’s day or celebrate a special moment. They are the perfect addition to a holiday dessert table because they look like little festive decorations that you can actually eat. If you are feeling a bit stressed or tired after a long day of work making these can be a very relaxing and mindful activity. The process of rolling the dough in your hands is very soothing and gives you a chance to focus on the present moment. These are also fantastic for people who love fitness because peanut butter is a great source of protein and healthy fats which gives you a nice energy boost. If you use dark chocolate you even get some good antioxidants that are healthy for your heart and your brain. They are great for packing into a lunch box as a surprise for your kids or taking to a neighbor as a kind gesture to show that you care about them. There is never a bad time to have a batch of these sitting in your fridge ready to be enjoyed by anyone who walks through your door.
This recipe is special because it focuses on using simple ingredients that you probably already have in your pantry right now. You do not have to go on a long search for rare items or spend a lot of money to make a high quality dessert. It is also a very flexible recipe that allows you to be creative and change things based on what you like or what you have available. If you prefer a bit of crunch you can use a different type of nut butter or add in some crushed nuts or seeds. The goal of this article is to guide you through every single step so that you feel confident and happy while you are making these treats. Even if you have never made a dessert in your life you will find that this method is very easy to follow and gives you perfect results every time. We will talk about how to get the chocolate just right and how to make sure your peanut butter centers are firm and delicious. By the time you finish reading you will be an expert at making the best chocolate peanut butter snowballs that your friends and family have ever tasted in their whole lives.
Ingredients You Will Need
To make these delicious snowballs you will need to gather a few simple items from your kitchen. Make sure you measure everything carefully to get the best texture.
-
Two cups of creamy peanut butter
-
One half cup of unsalted butter that has been softened at room temperature
-
One teaspoon of pure vanilla extract
-
Three and one half cups of powdered sugar which is also called confectioners sugar
-
Two cups of semi sweet chocolate chips or dark chocolate chips
-
Two tablespoons of coconut oil or vegetable shortening to help the chocolate melt smoothly
-
One pinch of fine sea salt to enhance the flavor of the nuts
-
Optional toppings like shredded coconut or white sugar or colorful sprinkles for decoration
Step by Step Method
Preparing Your Work Space
Before you start mixing any ingredients it is very helpful to set up your area. You want to have a clear counter space where you can work freely. Take a large baking sheet and line it with a piece of parchment paper or a silicone mat. This is very important because it prevents the snowballs from sticking to the tray after you dip them in the chocolate. If you do not have parchment paper you can use wax paper as well. Having everything ready will make the process much smoother and less messy.
Mixing the Peanut Butter Base
Grab a large mixing bowl and put your two cups of creamy peanut butter inside. Add the half cup of softened butter to the same bowl. It is much easier to mix if the butter is soft so try to leave it out on the counter for about thirty minutes before you start. Use a sturdy spoon or an electric hand mixer to blend these two ingredients together until they look very smooth and pale. Now add your one teaspoon of vanilla extract and the pinch of sea salt. Stir again to make sure the flavor is spread evenly throughout the mixture.
Adding the Powdered Sugar
Now it is time to add the sweetness and the structure. Start by adding the powdered sugar one cup at a time. If you add it all at once it might fly out of the bowl and make a big white cloud in your kitchen. Stir gently after each cup is added. You will notice that the mixture starts to get thicker and heavier as you add more sugar. It should eventually reach a consistency that feels like soft play dough. It should not be too sticky to touch. If it still feels very wet you can add a tiny bit more sugar until it is easy to handle with your hands.
Rolling the Snowballs
Once your dough is ready you can start shaping the snowballs. Use a small spoon or a cookie scoop to take a piece of the dough that is about one inch wide. Place the dough between your palms and roll it in a circular motion until it forms a perfect round ball. Place each ball onto your prepared baking sheet. Make sure to leave a little bit of space between each one so they do not touch. Continue this process until you have used up all of the dough in the bowl. You should end up with a lot of beautiful little peanut butter rounds.
Chilling the Centers
This is a very important step that you should not skip. Put the entire baking sheet into your freezer for at least thirty minutes or into your refrigerator for one hour. You want the peanut butter balls to be very cold and firm before you dip them in the warm chocolate. If they are too soft they might fall apart or lose their shape when they hit the liquid chocolate. While you wait for them to chill you can take a little break or start cleaning up your mixing bowl and spoons.
Melting the Chocolate Coating
When the peanut butter balls are cold and firm you can start preparing the coating. Take a microwave safe bowl and put your two cups of chocolate chips inside along with the two tablespoons of coconut oil. The oil is what makes the chocolate look shiny and helps it stay smooth when you are dipping. Heat the bowl in the microwave for thirty seconds and then take it out to stir. Continue heating in short bursts of fifteen seconds and stir each time until the chocolate is completely melted and looks like a dark glossy river. Be careful not to overheat it because chocolate can burn very easily.
The Dipping Process
Take your chilled peanut butter balls out of the freezer. Use a fork or a specialized dipping tool to pick up one ball at a time. Drop it gently into the bowl of melted chocolate. Use the fork to roll it around until every single side is covered in a thick layer of chocolate. Lift the ball up with the fork and tap it gently against the side of the bowl to let the extra chocolate drip off. Carefully place the covered snowball back onto the parchment paper. Repeat this for every single ball until they are all beautifully coated in chocolate.
Adding the Festive Decorations
While the chocolate is still wet and sticky you can add your decorations to make them look like real snowballs. Sprinkle some shredded coconut over the top to give them a fuzzy and white appearance. You can also use white sugar crystals or even a drizzle of white chocolate if you want to be extra fancy. If you are making these for a specific holiday like Valentine’s Day or Halloween you can use colored sprinkles that match the theme. The decorations will stick to the wet chocolate and stay there once it hardens.
Setting the Chocolate
Once all of your snowballs are decorated you need to let the chocolate set and become hard. You can leave them on the counter if your house is cool but it is much faster to put the tray back into the refrigerator for about twenty minutes. The cold air will make the chocolate snap and create that perfect shell that everyone loves. Once the chocolate is firm to the touch you can gently peel the snowballs off the parchment paper. They are now ready to be eaten or stored for later.
Proper Storage
If you have any leftovers which is rare because they are so good you should store them in an airtight container. You can keep them in the refrigerator for up to two weeks. Some people even like to keep them in the freezer because they taste like a cold candy bar when they are frozen. If you are giving them as a gift make sure to keep them in a cool place so the chocolate does not melt. These treats are very sturdy and hold their shape well as long as they stay away from direct heat or sunlight.
Why This Recipe Is Special
This recipe is special because it is designed for everyone regardless of how much experience they have in the kitchen. Many dessert recipes require you to use an oven and worry about things like baking powder or the exact temperature of the room. This no bake method removes all of that stress and lets you focus on the fun parts of cooking. You get a sense of accomplishment very quickly because you can see the results of your work in just a short amount of time. It is a great way to introduce kids to the kitchen because they can do almost every step themselves without any danger from hot surfaces.
From a health perspective this recipe offers more than just empty sugar. Peanut butter is a very dense source of nutrients including protein which helps build muscles and keeps you feeling full. It also contains healthy fats that are good for your skin and hair. When you make these at home you have total control over the ingredients. You can choose organic peanut butter that has no added oils or you can use a sugar substitute if you are watching your carbohydrate intake. By using high quality dark chocolate you are also getting flavonoids which are known to help reduce inflammation in the body and improve your overall mood.
The taste is another reason why this recipe stands out among all others. The contrast between the salty interior and the sweet exterior is a culinary classic for a reason. It hits all the right notes on your palate and provides a very satisfying mouthfeel. The way the chocolate shell cracks and then gives way to the creamy center is a very pleasant experience. It is a gourmet treat that costs very little to make but tastes like something you would buy at a high end candy shop. Sharing these with others creates a sense of community and happiness that is the true heart of why we cook for our loved ones.
Extra Tips for Better Taste
If you want to take your chocolate peanut butter snowballs to the next level there are a few creative things you can try. One great idea is to toast some of the shredded coconut in a pan for a few minutes before you sprinkle it on top. This gives the coconut a nutty and deep flavor that goes perfectly with the peanut butter. You can also try adding a surprise inside the middle of each ball. Try putting a single mini marshmallow or a small piece of pretzel in the center before you roll it. This adds a hidden texture that will delight anyone who takes a bite.
Another tip is to experiment with the type of chocolate you use for the coating. While semi sweet is the most common choice you can use white chocolate for a very sweet and creamy look. You could even do a double dip where you coat them in dark chocolate first and then drizzle white chocolate over the top in a pretty pattern. If you like a more intense flavor you can add a half teaspoon of instant espresso powder to the melted chocolate. Coffee actually makes the flavor of chocolate taste much stronger and richer without making it taste like a cup of java.
The quality of your peanut butter also makes a big difference in the final result. If you use the natural kind that has oil sitting on the top make sure you stir it very well before measuring. Sometimes natural peanut butter can be a bit more oily so you might need to add an extra quarter cup of powdered sugar to keep the balls firm. If you prefer a crunchy texture use extra crunchy peanut butter instead of smooth. This adds tiny bits of roasted peanuts throughout the snowball which provides a great contrast to the soft sugar and smooth chocolate coating.
Final Thoughts
Making these chocolate peanut butter snowballs is a wonderful journey that ends in a very delicious way. It is a recipe that reminds us that some of the best things in life are simple and do not require a lot of complicated steps. Whether you are making them for a big party or just as a treat for yourself the process is filled with joy and creativity. We hope that this guide has made you feel excited to get into the kitchen and start rolling your own batch of treats. Remember that the most important ingredient is the love you put into your cooking and the happiness you feel when you share your creations with the people around you. Enjoy every single bite of your homemade snowballs and have fun experimenting with all the different ways to make them your own.
Nutrition Details
Here is a look at what is inside these tasty treats. These numbers are based on one single snowball which is one serving. The recipe usually makes about thirty snowballs in total depending on how large you roll them.
| Nutrient Item | Amount Per Serving |
| Total Calories | 160 calories |
| Total Fat | 10 grams |
| Saturated Fat | 5 grams |
| Cholesterol | 10 milligrams |
| Sodium | 85 milligrams |
| Total Carbohydrates | 16 grams |
| Dietary Fiber | 1 gram |
| Total Sugars | 14 grams |
| Protein | 3 grams |
| Vitamin D | 0 percent |
| Calcium | 2 percent |
| Iron | 4 percent |
| Potassium | 2 percent |