 Skip to content
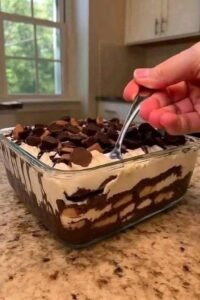
If you are searching for an incredible sweet baking alternative or a restaurant-quality centerpiece that combines a beautifully cool exterior with a rich, creamy filling, you have come to the right place today. This special guide is all about creating a comforting dish of chocolate peanut butter icebox cake that utilizes a blend of crisp graham crackers or cookies, velvety layers, and melted chocolate pockets to build a spectacular treat for your entire household. It completely transforms standard pantry items and premium dairy from your local market into a perfectly chilled dessert masterpiece that melts in your mouth with every single bite. As the sweet layers slowly set inside your kitchen refrigerator, the rich internal creams mix completely around the tender cookies, creating an amazing fusion of fluffy texture and decadent satisfaction. This specific recipe turns a basic weeknight sweet craving into a gorgeous gourmet creation that looks exactly like a high-end bistro dish but can be created easily by anyone working in a home kitchen.
People all over the world are absolutely falling in love with this chilled dessert style because it delivers an exciting contrast of textures and a deeply satisfying flavor profile that basic plain vanilla sponge cakes simply cannot match. Instead of settling for a dry, overcooked treat or a heavy, one-dimensional pastry, crafting your own icebox cake allows you to control the exact distribution of rich peanut butter cream and deep chocolate pudding layers, ensuring you get a sturdy structure that holds a generous pocket of toppings perfectly without falling apart. The clever combination of a cold exterior chill, a touch of creamy sweetness, and a luscious chocolate matrix ensures a perfect balance where every single spoonful feels like an authentic country cafe celebration. It is a fantastic way to elevate your evening dining routine, giving you a highly reliable kitchen strategy that satisfies hungry family members or impresses party guests simultaneously using simple, wholesome ingredients.
You should definitely make this wonderful recipe whenever you want to simplify your weekend entertaining, surprise your loved ones for a special movie night at home, or reward your body with a comforting treat after a long week. On warm afternoons or relaxed weekends when you want your kitchen to feel extra inviting, the simple, rhythmic process of layering the ingredients and carefully chilling the pan brings an instant wave of creativity and happiness to your routine. Many home cooks adore preparing this dish because it looks incredibly intricate and sophisticated, yet requires zero active oven time, which helps preserve your kitchen’s temperature and your energy efficiently. Whatever your personal motivation might be, sliding a beautifully layered glass dish of this rich dessert onto your dining table will spark joyful conversation and bring pure happiness to your meal. You can see exactly how magnificent and deeply satisfying this layered masterpiece looks when a spoon plunges into its fluffy toppings inside image_ace526.jpg.
Ingredients You Will Need
To create this delightfully rich and satisfying dessert dish, you will need to gather a few basic items from your local grocery store. The exact measurements are carefully listed below to ensure your creamy pockets hold together beautifully and set into a perfectly uniform texture.
-
Graham crackers or chocolate wafer cookies: 300 grams
-
Cream cheese, softened to room temperature: 225 grams
-
Creamy peanut butter: 250 grams
-
Sweetened condensed milk: 300 grams
-
Heavy whipping cream: 480 milliliters
-
Instant chocolate pudding mix: 100 grams
-
Cold whole milk (for the pudding): 500 milliliters
-
Pure vanilla extract: 1 teaspoon
-
Mini peanut butter cups, chopped: 150 grams
-
Semi-sweet chocolate chips (melted for drizzle): 50 grams
Step by Step Method
Creating this classic decadent no-bake recipe is exceptionally easy and highly rewarding if you follow these detailed instructions closely. Even if you are a complete beginner who has never assembled an icebox cake before, these clear steps will guide you to a flawless, ultra-creamy result on your very first try.
Step 1: Preparing the Chocolate Pudding
In a large ceramic mixing bowl, combine your instant chocolate pudding mix and cold whole milk. Whisk vigorously for 2 minutes using a wire whisk until the liquid begins to thicken into a smooth, velvety glaze. Place the bowl into your refrigerator for 5 minutes to let it set completely.
Step 2: Whipping the Heavy Cream
In a separate medium bowl, beat your cold heavy whipping cream using an electric hand mixer on high speed for 3 to 4 minutes. Continue mixing until stiff peaks form across the surface, meaning the cream holds its shape perfectly when you lift the beaters out of the bowl. Divide this whipped cream into two equal portions and set aside.
Step 3: Beating the Peanut Butter Base
Place your softened cream cheese and creamy peanut butter into another large mixing bowl. Beat the mixture vigorously for 2 minutes using your electric mixer until the texture becomes completely smooth, fluffy, and free of any stubborn lumps.
Step 4: Incorporating the Sweet Milk
Pour the sweetened condensed milk and pure vanilla extract slowly into the beaten peanut butter mixture. Mix on medium speed until the liquids emulsify completely, preventing the delicate dessert mixture from separating before it sets. Gently fold in one of your portions of whipped cream with a spatula to lighten the texture.
Step 5: Setting the First Layer
Take a standard -inch glass baking dish. Arrange a single, flat layer of graham crackers or wafer cookies along the bottom of the dish, breaking them slightly if necessary to cover the surface uniformly. This forms the foundational crust of your cake.
Step 6: Spreading the Rich Fillings
Spoon half of your prepared chocolate pudding over the cookie base and smooth it into a flat layer using a silicone spatula. Next, gently spread half of the fluffy peanut butter cream directly over the chocolate layer, being careful not to disturb the pudding underneath.
Step 7: Repeating the Stack
Place a second layer of graham crackers or wafer cookies over the peanut butter cream. Repeat the process by spreading the remaining chocolate pudding, followed by another layer of cookies, and the remaining peanut butter cream, creating a gorgeous alternating multi-layer matrix.
Step 8: Adding the Top Coating
Spread the second half of your plain whipped cream smoothly across the very top layer of the cake. This clean white layer provides a stunning visual contrast to the deep, rich tones hidden directly beneath the surface.
Step 9: The Chocolate Top Garnish
Scatter your chopped mini peanut butter cups generously over the whipped cream surface. For a beautiful professional finish, melt your semi-sweet chocolate chips and drizzle thin, elegant lines across the toppings, exactly like the decadent visual styling displayed inside image_ace526.jpg.
Step 10: The Long Cold Chill
Place the filled glass pan flat inside your kitchen refrigerator. Let the dessert chill undisturbed for at least 4 to 6 hours, or overnight if possible. The cold temperature allows the cookies to absorb moisture from the surrounding cream, completely softening them into a tender, cake-like texture that slices cleanly. Serve cold straight from the fridge!
Why This Recipe Is Special
This recipe stands out from traditional bakery preparations because it celebrates a beautiful harmony of rich, contrasting flavors combined with an exceptional contrast of textures. The clever technique of building an alternating layered cake ensures that every single bite delivers a flawless balance of salty peanut butter, sweet chocolate, and fluffy whipped cream, while the crisp cookies undergo a gorgeous transformation into a melt-in-your-mouth sponge texture in the cold refrigerator.
From an entertaining standpoint, choosing to make this comforting dessert at home allows you to enjoy a stress-free hosting experience. Because it requires zero oven time and actively benefits from resting overnight, it provides a highly reliable kitchen strategy that frees up your schedule on the day of a dinner party or family gathering. It delivers a luxurious dining experience that feels incredibly indulgent and brings absolute joy to anyone who loves the classic pairing of chocolate and peanut butter.
Another reason this recipe is so special is its exceptional visual appeal and capability to make home-cooked food feel completely upscale. The striking presentation of rich, dark chocolate and pale tan peanut butter bands visible through the side of a clear glass pan creates a gorgeous palette that instantly stimulates the appetite. When you plunge a spoon through the fluffy white cream and dark chocolate cup toppings, it reveals a dense, beautiful cross-section that turns an ordinary night into a celebration, perfectly matching the presentation style highlighted inside image_ace526.jpg.
Extra Tips for Better Taste
If you want to take your homemade culinary experience to an even higher level of gourmet excellence, you can try a few creative adjustments to suit your personal preferences. Selecting the right cookie type is highly important; while classic honey graham crackers offer a beautiful nostalgic crunch, using dark chocolate wafer cookies or thin chocolate sandwich cookie halves adds an extra depth of cocoa flavor that pairs spectacularly with the peanut butter cream.
You can also experiment with your texture choices to create a much more complex profile for your family or guests. Folding a handful of crushed pretzel bits or roasted salted peanuts directly into the peanut butter layer introduces a magnificent layer of savory salt and a distinct crunch that cuts through the rich dairy fats beautifully, creating a multi-layered taste profile that will keep your family reaching for the serving dish.
If you struggle with your cake turning out too messy or collapsing when you try to slice it, ensure that you allow the dish to chill for the full recommended 6 hours. Another amazing trick to ensure clean, square cuts is to dip a sharp chef’s knife into a tall glass of hot water and wipe it clean with a towel before making each individual slice, which cuts through the softened cookie layers effortlessly without dragging the cream.
For those who want to achieve an extra touch of luxury, try adding a warm caramel drizzle or a light dusting of high-quality cocoa powder over the top right before serving. Stacking the chopped toppings high and allowing some of the chocolate drizzle to run down the inside edges of the clear glass pan creates a dramatic, mouthwatering display that emphasizes the handcrafted nature of your creation, matching the professional standard established inside image_ace526.jpg.
Final Thoughts
Cooking your own gourmet desserts from scratch should always feel like an uplifting and rewarding journey in your kitchen, and this no-bake chocolate peanut butter icebox cake proves that you can achieve legendary culinary results using simple supermarket staples and zero heat. It is a bold, fun, and deeply satisfying recipe that turns a basic package of cookies and cream into an extraordinary culinary adventure for beginners and experienced home cooks alike. Do not feel discouraged if your cream layers blend slightly during assembly, as the beautiful dark chocolate cups and rich textures peeking through the top will easily charm everyone at your table. Gather your ingredients, layer your pan with enthusiasm, and enjoy the wonderful process of sharing a comforting dish of pure happiness with your loved ones today.
Nutrition Details
Here is a clear breakdown of the estimated nutritional content for this chocolate peanut butter icebox cake recipe. The numbers represent the average values for one individual serving when the total recipe is divided into twelve equal, generous square portions.
Disclaimer
Please remember that every individual human body is completely unique and personal health results may change depending on your specific metabolism, daily physical activity levels, and overall food choices. The nutritional values provided in this article are estimates calculated using standard ingredient databases and could vary slightly depending on the specific fat content of your cream cheese or the brand of peanut butter you select at the market counter. It is always a wise idea to consult with a qualified primary care physician or a registered dietitian before making significant modifications to your daily eating pattern or lifestyle routine.
The Science of Moisture Migration in No-Bake Cakes
To become a truly confident cook when working with no-bake desserts, it helps to understand the fascinating physical science that occurs inside your cold refrigerator over time. Baked biscuits and graham crackers are primarily composed of tightly bound starch networks that have been thoroughly dehydrated during the original baking process, giving them a rigid, brittle structure.
When you sandwich these dry cookies between layers of moist chocolate pudding and peanut butter cream, a natural thermodynamic process called moisture migration begins to take place. The water molecules locked within the dairy emulsions slowly release and travel into the dry porous spaces of the cookies. As the starch strands absorb this moisture, they expand and soften, transforming the brittle crackers into a uniform, tender texture that perfectly mimics a traditional oven-baked sponge cake without using any heat.
Understanding Lipid Stabilization in Peanut Butter Creams
The overall structural success and luxurious mouthfeel of your peanut butter layer depend heavily on the stabilizing properties of the lipids and fats found inside your ingredients. Peanut butter is a natural suspension of solid peanut particles held within oil networks, which can easily separate or turn runny when exposed to warm temperatures.
When you beat the peanut butter together with softened cream cheese, the dairy proteins and lactic acids wrap around the vegetable fats, creating a highly stable, tight emulsion. As this mixture cools inside the refrigerator, the saturated fats solidify cleanly, creating a structured matrix that holds its shape perfectly under pressure. This ensures that your cake remains beautifully firm when sliced and prevents the heavier chocolate pudding layers from sinking into the base.
The Role of Air Retention in Whipped Cream Top Layers
A common question that beginner home cooks ask when making layered icebox desserts is why their top whipped cream layer sometimes turns watery or deflates after sitting in the fridge. The answer lies in the molecular physics of protein and fat networks within heavy dairy liquids.
Heavy cream contains a high concentration of fat globules surrounding tiny pockets of water. When you strike the cream vigorously with an electric mixer, you force millions of tiny ambient air bubbles into the liquid while simultaneously breaking the outer membranes of the fat globules. These exposed fats link together, forming a tight physical web that traps the air bubbles securely in place. Chilling the cake promptly locks this airy framework into a solid state, ensuring a fluffy, cloud-like topping that supports the weight of heavy toppings like the chopped chocolate cups shown in image_ace526.jpg.