 Skip to content
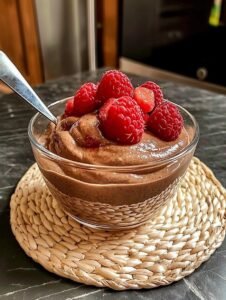
Introduction
Making your own homemade chocolate pudding is a wonderful journey into the world of simple desserts that bring a lot of joy to your home. This recipe is all about going back to the basics and using real ingredients to create something that tastes much better than the stuff you find in a plastic cup at the store. When you make pudding from scratch you have total control over what goes inside which means you can make it as rich or as light as you want. Many people think that making a smooth and creamy dessert like this is very hard or requires special skills but that is actually not true at all. All you really need is a heavy pot and a whisk and a little bit of patience while you stand by the stove watching the magic happen. This article will guide you through every single part of the process so that you feel confident and excited to try it out today. By the time you finish reading this you will understand exactly how to mix your dry ingredients and your wet ingredients to get a perfect result every time you cook. There is something very special about watching a liquid turn into a thick and glossy cream right before your eyes and that is exactly what we are going to do here.
People absolutely love chocolate pudding because it feels like a warm hug for your soul and it reminds many of us of our childhood years. It is one of those rare desserts that works perfectly whether it is served warm on a cold winter night or chilled until it is cold on a hot summer afternoon. The texture is the most important part because a great pudding should be silky and smooth without any lumps or bumps at all. Another reason why this recipe is so popular is that it uses very basic items that you probably already have sitting in your kitchen cupboards right now. You do not need to go on a long shopping trip to find fancy or expensive items because milk and sugar and cocoa are the main stars of the show here. It is also a very forgiving recipe which means that even if you make a small mistake you can usually fix it quite easily with a bit more stirring. Many families have their own version of this treat that they pass down through many years because it is so reliable and satisfying for everyone. Kids love it because it is sweet and fun to eat while adults love it because it feels like a sophisticated way to enjoy deep chocolate flavors without too much effort.
You might be wondering when is the best time to make this chocolate pudding or why you should choose it over other sweet options like cookies or cake. One of the best reasons to make this recipe is for the emotional comfort it provides when you have had a long or stressful day at work or school. The act of slowly stirring the pot can be very relaxing and meditative which helps you clear your mind while you prepare a treat for yourself or your family. It is also a fantastic choice for people who are looking for a dessert that is not too heavy or greasy because it relies on milk rather than lots of butter or oil. If you are someone who watches what they eat you can even use low fat milk or a natural sweetener to make it fit into your fitness goals more easily. This pudding is perfect for birthday parties or holiday dinners or even just a random Tuesday when you want to show someone you care about them. There is a deep sense of pride that comes from serving a homemade dessert that looks and tastes like it came from a professional bakery. Plus the smell of chocolate filling up your kitchen while the pudding cooks is enough to make anyone in the house feel happy and hungry.
Finally we should talk about the taste and the way this recipe can be customized to fit your specific cravings at any moment. The deep flavor of the cocoa powder combines with the sweetness of the sugar to create a balanced profile that is not too sugary but still very indulgent. You can choose to add a little bit of vanilla to make it taste more complex or even a tiny pinch of salt to bring out the hidden notes of the chocolate. Some people like to add a bit of cinnamon or even some espresso powder if they want a more grown up version of this classic treat. The consistency can also be changed depending on how long you cook it so you can have a thin sauce or a very thick custard that holds its shape on a spoon. This recipe is designed to be a foundation that you can build upon as you become more comfortable in the kitchen. Once you master the basic steps you will find yourself making this pudding all the time for your friends and your neighbors. It is a great way to practice your whisking skills and to learn how heat changes the way food behaves when it is mixed with starch. Let us get started with the list of things you will need to gather before we begin the actual cooking process.
Ingredients You Will Need
To make this delicious chocolate pudding you will need to collect the following items from your pantry and fridge. Please make sure you measure everything carefully because baking and pudding making are a bit like science where the amounts matter.
-
2.5 cups of whole milk for a very rich and creamy texture
-
0.5 cup of granulated white sugar to provide the perfect sweetness
-
0.3 cup of unsweetened cocoa powder for that deep chocolate flavor
-
3 tablespoons of cornstarch which acts as the thickening agent
-
0.25 teaspoon of fine salt to balance the sugar and enhance the cocoa
-
1 teaspoon of pure vanilla extract for a beautiful aroma and taste
-
1 tablespoon of unsalted butter to give the pudding a glossy shine
-
Optional toppings like whipped cream or fresh berries or chocolate shavings
Step by Step Method
Step 1: Mix the Dry Ingredients
Start by taking a medium sized saucepan and placing it on your counter before you turn on any heat. You want to add your sugar and your cocoa powder and your cornstarch and your salt into this pot. Use a dry whisk to stir these four items together until they look like a uniform light brown powder. It is very important to break up any big lumps of cocoa powder or cornstarch now because it is much harder to get rid of lumps once you add the liquid later on. Taking an extra minute to whisk the dry items will ensure that your final pudding is as smooth as silk.
Step 2: Add the Milk Slowly
Now you want to take your milk and start pouring it into the pot very slowly. Do not pour all of it at once because that might cause the cornstarch to clump up. Start with just a tiny splash of milk and whisk it into the dry powder until you have a thick paste that looks like chocolate mud. Once that paste is smooth you can add a bit more milk and keep whisking until everything is combined and there are no dry spots left in the pot. Now you can pour in the rest of the milk and give it one final stir to make sure the mixture is completely even.
Step 3: Cook on Medium Heat
Place your saucepan on the stove and turn the heat to a medium setting. You do not want the heat to be too high because milk can burn very easily on the bottom of the pan and that would ruin the taste. Stand right there by the stove and start whisking the liquid constantly. You should move your whisk in circles and also across the bottom of the pan to make sure nothing is sticking or burning. As the milk gets warmer you will notice that the mixture starts to smell very good and the color will become a bit darker.
Step 4: Watch for Thickening
After about five to eight minutes of constant stirring you will feel the mixture start to get heavier against your whisk. This is the cornstarch beginning to do its job as it reacts to the heat. Keep stirring until you see the first few bubbles pop on the surface of the liquid. Once it starts to boil slightly you should keep whisking for about one more minute. This extra minute ensures that the cornstarch is fully cooked so your pudding does not taste like raw flour or starch. The pudding should now look thick enough to coat the back of a metal spoon.
Step 5: Add the Final Touches
Take the pot off the heat immediately and set it on a cool surface or a heat proof mat. Now is the time to add your vanilla extract and your tablespoon of butter. Stir these in quickly while the pudding is still very hot so the butter melts completely and disappears into the cream. The butter is a secret trick that makes the pudding look extra shiny and gives it a professional finish. You will see the texture change slightly as it becomes even more smooth and luxurious right before your eyes.
Step 6: Cool the Pudding
You can eat the pudding while it is warm if you simply cannot wait but it is usually best after it has cooled down. Pour the mixture into individual glass bowls or one large serving dish. If you do not like the thin skin that sometimes forms on top of pudding you can press a piece of plastic wrap directly onto the surface of the hot liquid. This prevents air from touching the top and keeps it soft. Let the bowls sit on the counter for about twenty minutes and then put them in the fridge for at least two hours to set completely.
Step 7: Serve and Enjoy
Once the pudding is cold and firm you can take it out of the fridge and remove the plastic wrap. This is the fun part where you can get creative with how you present your dessert. You can add a big dollop of whipped cream on top or maybe sprinkle some crushed cookies for a bit of crunch. Some people like to add fresh raspberries because the tart fruit goes perfectly with the sweet chocolate. Grab a spoon and enjoy the creamy and rich treat that you made all by yourself from scratch.
Why This Recipe Is Special
This chocolate pudding recipe is special because it avoids all the chemicals and preservatives that you usually find in boxed mixes or pre made snacks. When you look at the back of a store bought pudding cup you will often see a long list of words that are hard to pronounce. In this version you only use five or six real ingredients that come from nature. This makes it a much healthier choice for kids and for people who want to be more mindful about what they put into their bodies. Because we use real cocoa powder you are also getting some of the natural antioxidants that are found in cacao beans which is a nice bonus for a dessert.
The taste is also far superior because the flavor of real milk and butter cannot be matched by vegetable oils or artificial thickeners. The texture is another reason why this recipe stands out from the crowd. It has a certain weight and richness that feels very satisfying without being overly oily. It is also very special because it is a low waste recipe since you are not throwing away lots of plastic packaging every time you want a snack. Making this at home shows a level of care and attention to detail that your guests will definitely notice when they take their first bite. It is a simple luxury that proves you do not need to spend a lot of money to have a high quality experience in your own dining room.
Extra Tips for Better Taste
If you want to take your chocolate pudding to the next level there are a few creative things you can try. First you can try using different types of milk like coconut milk or almond milk if you want a different flavor profile or if you do not drink dairy. Coconut milk makes the pudding taste like a tropical treat and adds a lot of natural creaminess. Another great tip is to use high quality cocoa powder because the better the cocoa the better the pudding will be in the end. Some people like to use dark cocoa for a very intense and slightly bitter flavor while others prefer a lighter Dutch processed cocoa for a smoother taste.
You can also try adding a tiny bit of spice like a pinch of cayenne pepper if you enjoy a Mexican chocolate style treat that has a little bit of a kick. If you love coffee you can replace a small amount of the milk with strong brewed coffee to create a mocha flavor that is very popular with adults. Another trick is to fold in some chocolate chips while the pudding is still warm so they melt slightly and create little pockets of extra chocolate. For a bit of texture you can stir in some toasted nuts or even some small pieces of marshmallows right before you put the bowls into the fridge. The possibilities are truly endless when you start with such a solid and simple base recipe.
Final Thoughts
Making chocolate pudding from scratch is a rewarding experience that everyone should try at least once in their life. It teaches you how simple ingredients can transform into something complex and wonderful with just a little bit of heat and effort. This recipe is a perfect starting point for any beginner cook who wants to learn the basics of making a custard or a thickened sauce. It is a dish that brings people together and creates happy memories around the kitchen table. Whether you serve it for a special occasion or just as a simple treat after a long day it is sure to be a hit with anyone who loves chocolate. We hope you enjoy every step of the process and find as much joy in eating it as you did in making it. There is nothing quite like the taste of success when you pull a perfectly chilled bowl of homemade pudding out of the fridge.
Nutrition Details
This table provides an estimate of the nutrition found in one serving of this chocolate pudding. Please remember that these numbers can change based on the specific brands of ingredients you choose to use.
| Nutrient | Amount Per Serving |
| Calories | 210 |
| Total Fat | 8 grams |
| Saturated Fat | 5 grams |
| Cholesterol | 25 milligrams |
| Sodium | 150 milligrams |
| Total Carbohydrates | 32 grams |
| Dietary Fiber | 2 grams |
| Sugars | 26 grams |
| Protein | 5 grams |
| Vitamin D | 10 percent |
| Calcium | 15 percent |
| Iron | 6 percent |