 Skip to content
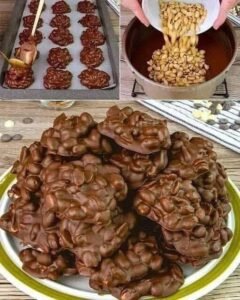
Introduction
Making your own candy at home might sound like a very hard task that only professional chefs can do but that is not the case at all with this recipe. This chocolate peanut clusters recipe is one of the most simple and rewarding things you can create in your own kitchen without any special tools or fancy skills. When you think about the perfect snack you probably want something that is sweet and salty while also being very crunchy and satisfying to chew on. This recipe brings all those feelings together into a small bite sized treat that looks beautiful on a plate and tastes even better than what you find in stores. The magic of this recipe lies in the combination of rich melted chocolate and perfectly roasted peanuts which creates a texture that is both smooth and snappy at the same time. You do not need an oven or a stove if you prefer to use a microwave and that makes it a perfect project for people who are just starting their journey into cooking. It is a wonderful way to spend an afternoon because you get to see how a few simple ingredients can turn into a professional looking dessert in just a few minutes.
People all over the world absolutely love these little clusters because they represent the ultimate comfort food that appeals to almost everyone regardless of their age. There is something truly special about the way chocolate melts on the tongue while the peanuts provide a deep earthy flavor that cuts through the sugar and keeps you coming back for more. Many people find that eating these treats brings back warm memories of family gatherings or holiday parties where a large tray of homemade candy was always the star of the show. The love for this snack also comes from how customizable it is because you can use different types of chocolate or different types of nuts depending on what you like best. It is a very forgiving recipe which means that even if you make a small mistake it will likely still taste amazing and your friends will be very impressed. Because it is so easy to share these clusters have become a symbol of kindness and generosity in many homes where people pack them into small bags to give away. You will find that once you start making these for your friends they will start asking for the recipe every single time they see you because the taste is simply unforgettable.
There are so many great reasons to make these chocolate peanut clusters and many of them are rooted in the emotions we feel when we share food with others. If you are feeling a bit stressed or tired after a long week of work spending time in the kitchen making a simple treat can be a very relaxing way to clear your mind and focus on something creative. For those who care about fitness or health this recipe can be a great way to satisfy a sweet tooth while also getting some protein and healthy fats from the peanuts. You can choose dark chocolate which has many antioxidants and combine it with unsalted nuts to create a snack that feels much better for your body than a standard candy bar from the gas station. It is also the perfect activity for a rainy day when you want to stay inside and make the house smell like a chocolate factory which is a smell that everyone loves. If you have children they will have a lot of fun helping you scoop the mixture onto the trays and it is a safe way to introduce them to the joy of making food from scratch. Whether you are preparing for a big birthday party or just want a small snack to eat while watching a movie these clusters are the perfect choice for any occasion.
The simplicity of this recipe is what makes it so special for beginners who might be afraid of more complex baking projects that require exact measurements and timing. You do not have to worry about a cake sinking in the middle or cookies burning on the bottom because this is a no bake method that relies on cooling rather than heating. It teaches you the basics of how chocolate behaves when it is melted and how to keep it smooth and shiny which is a useful skill for many other desserts. Because you are in control of the ingredients you can ensure that there are no weird chemicals or preservatives in your food which is a big plus for anyone trying to eat more naturally. You can make a massive batch of these in under thirty minutes and they will stay fresh for a long time if you store them correctly in a cool place. This recipe is all about having fun and enjoying the process of creating something delicious with your own two hands while knowing that the result will be a crowd pleaser. Once you master this basic version you will feel much more confident in the kitchen and ready to try even more exciting recipes in the future.
Ingredients You Will Need
To make the best chocolate peanut clusters you need to focus on getting good quality ingredients because there are only a few of them and their flavors will really stand out. Please make sure you have everything ready on your counter before you start so the process goes smoothly.
-
Two cups of semi sweet chocolate chips
-
One cup of milk chocolate chips
-
Two and a half cups of roasted salted peanuts
-
One tablespoon of refined coconut oil
-
One teaspoon of pure vanilla extract
-
A small pinch of sea salt for the topping
Step by Step Method
Following these steps will ensure that your candy comes out perfectly every single time without any stress. Read through all the steps once before you begin so you know exactly what is coming next.
Preparing Your Space
The first thing you need to do is prepare a large baking sheet or a flat tray where the clusters can sit and get firm. Line this tray with parchment paper or a silicone baking mat so the chocolate does not stick to the surface. If you do not have these you can use wax paper as well. Having this ready is very important because the chocolate can start to set quickly once you mix it and you want to be able to scoop it immediately.
Melting the Chocolate
You have two ways to melt your chocolate and both work very well for this recipe. If you want to use the microwave put all your chocolate chips and the coconut oil into a large glass bowl that is safe for the microwave. Heat the chocolate for thirty seconds and then take it out to stir it with a spoon or a spatula. Even if it does not look melted yet the heat from the bowl will help it soften. Continue heating in short bursts of fifteen seconds and stir well after each time until the mixture is completely smooth and looks like a shiny liquid.
If you prefer to use the stove you can use a double boiler method. Fill a small pot with an inch of water and place a glass bowl on top of the pot making sure the bottom of the bowl does not touch the water. Turn the heat to low and put your chocolate and coconut oil in the bowl. As the water simmers the steam will gently heat the bowl and melt the chocolate. Stir it constantly until it is smooth and then remove the bowl from the heat very carefully because it will be hot.
Adding the Flavor
Once your chocolate is melted and smooth it is time to add the vanilla extract. Pour the vanilla into the melted chocolate and stir it in quickly. You might notice the chocolate gets a tiny bit thicker but the vanilla adds a wonderful depth of flavor that makes the candy taste much more expensive. Ensure that no water gets into the chocolate during this process because even a single drop of water can cause the chocolate to become grainy and hard which is something we want to avoid.
Mixing in the Peanuts
Now it is time for the best part which is adding the peanuts. Dump all two and a half cups of roasted peanuts into the bowl of melted chocolate. Use a large spoon to fold the peanuts into the liquid until every single nut is completely coated in a thick layer of chocolate. You want to make sure there are no dry spots left. The mixture will look very chunky and delicious at this stage and it will be quite thick.
Scooping the Clusters
Take a regular tablespoon or a small cookie scoop and start placing small piles of the mixture onto your prepared baking sheet. You can make them as large or as small as you like but usually a heap the size of a golf ball is perfect for a single serving. Make sure to leave a little bit of space between each cluster so they do not grow together into one big piece of candy. If you want them to look extra fancy you can sprinkle a tiny bit of sea salt on top of each cluster while the chocolate is still wet.
Cooling and Setting
Place the tray in a cool spot in your kitchen or put it in the refrigerator if you want them to be ready faster. It usually takes about thirty to sixty minutes for the chocolate to become hard again. Do not try to move them or touch them until they are completely firm to the touch. Once they are solid you can peel them off the paper very easily. They should be shiny and have a nice snap when you bite into them.
Why This Recipe Is Special
This recipe is special because it finds the perfect balance between being a decadent treat and a snack that actually provides some value to your body. Peanuts are a fantastic source of plant based protein and they contain healthy fats that are good for your heart and your brain. When you mix them with chocolate you are getting a boost of energy that can help you get through a busy afternoon. If you choose to use dark chocolate with a high cocoa content you are also getting a lot of antioxidants which help protect your cells from damage.
Another reason this recipe stands out is that it is naturally gluten free which makes it a safe and delicious option for people who have allergies or sensitivities to wheat. In a world where many snacks are filled with flour and fillers this is a clean and simple alternative that everyone can enjoy together. It is also very affordable to make because peanuts and chocolate chips are common items that you can find at any grocery store for a low price. You can make a very large amount of candy for the same price that you would pay for just a few pieces of luxury chocolate at a mall.
The taste is the biggest reason why this recipe is a winner in every home. The saltiness of the peanuts perfectly balances the sweetness of the chocolate so it never feels like it is too much. The crunch of the nut combined with the velvety texture of the melted chocolate creates a sensory experience that is very satisfying. It is the kind of snack that feels like a reward after a long day and because you made it yourself you can feel proud of the quality and care that went into every bite.
Extra Tips for Better Taste
If you want to take your chocolate peanut clusters to the next level there are a few creative things you can try to make them even better. One great tip is to toast your peanuts in a pan for a few minutes before you add them to the chocolate even if they are already roasted. This warms up the oils in the nuts and makes the flavor much more intense and aromatic. Just make sure the nuts are cool before you stir them into the chocolate so they do not make the mixture too thin.
You can also experiment with different types of chocolate to find your favorite blend. Some people love using white chocolate for a very sweet and creamy taste while others prefer a mix of extra dark chocolate and butterscotch chips for a unique flavor profile. If you like a bit of a kick you can add a tiny pinch of cayenne pepper or cinnamon to the melted chocolate to give it a warm and spicy finish. This is a very popular trend in modern candy making and it goes surprisingly well with peanuts.
For a bit of extra texture you can add other small ingredients to the mix along with the peanuts. Things like dried cranberries or small pieces of pretzel add another layer of flavor and a different kind of crunch. You could also stir in some shredded coconut or even a few mini marshmallows if you want a cluster that is a bit more chewy. The possibilities are endless and you can really let your imagination run wild once you have the basic method down.
If you are giving these away as a gift try placing each cluster into a small paper cupcake liner. This makes them look like they came from a high end candy shop and it keeps the chocolate from melting onto people’s fingers when they pick them up. You can find colorful liners for different holidays to make the gift feel even more festive. Storing your clusters in the fridge will keep them extra crunchy and cold which many people find is the best way to eat them.
Final Thoughts
This chocolate peanut clusters recipe is a true classic that proves you do not need a lot of time or money to create something wonderful. It is a joy to make and an even bigger joy to eat and share with the people you care about the most. Whether you are a total beginner in the kitchen or someone who has been cooking for years this recipe will quickly become one of your favorite things to whip up. Remember to have fun with the process and do not be afraid to try new things as you become more comfortable with the steps. Enjoy your homemade treats and the smiles they bring to everyone who tastes them.
Nutrition Details
Below is a table that shows the estimated nutrition for this recipe. These numbers are based on one serving which is approximately one medium sized cluster. Keep in mind that these are estimates and can change depending on the specific brands of ingredients you choose to use at the store.
| Nutrition Fact | Amount Per Serving |
| Calories | 150 calories |
| Total Fat | 10 grams |
| Saturated Fat | 4 grams |
| Cholesterol | 2 milligrams |
| Sodium | 45 milligrams |
| Total Carbohydrates | 14 grams |
| Dietary Fiber | 2 grams |
| Sugars | 10 grams |
| Protein | 3 grams |
| Iron | 4 percent |
| Calcium | 2 percent |