 Skip to content
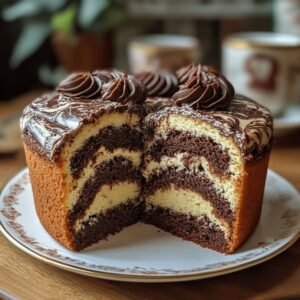
Introduction
Marble cake is a true classic that brings together the best of two worlds in a single slice of heaven. When you look at a piece of marble cake, you see beautiful swirls of dark chocolate and light vanilla dancing together in a pattern that looks like real marble stone. This recipe is designed to help you create that stunning visual effect while ensuring the texture remains incredibly soft and moist for days. Many people find baking a bit scary because they think it requires professional skills, but this specific guide will show you that anyone can do it with just a little bit of patience. We will talk about how to mix the batters so they are perfectly balanced and how to create those famous swirls without mixing the colors too much. By the following these simple instructions, you will be able to make a cake that looks like it came from a fancy bakery right in your own kitchen. It is a wonderful way to express your creativity because no two marble cakes ever look exactly the same inside. You are essentially painting a picture with cake batter, and that is what makes this baking project so much fun for everyone involved.
People absolutely love marble cake because it solves the oldest problem in the world of desserts which is choosing between chocolate and vanilla. There are always people who want the deep and rich taste of cocoa, and there are others who prefer the delicate and sweet scent of vanilla beans. This cake provides both flavors at the same time, so nobody has to feel like they are missing out on their favorite treat. Beyond the taste, there is a deep sense of nostalgia attached to this specific type of cake for many families across the globe. It reminds people of grandmotherly kitchens and Sunday afternoons where the house was filled with the warm scent of baking sugar and butter. The texture is another reason why it remains a top choice for cake lovers everywhere. A well made marble cake is dense enough to hold its shape but light enough to melt in your mouth as soon as you take a bite. It is not overly sweet, which allows the natural flavors of the high quality ingredients to shine through in every single mouthful. This balance of flavor and texture is why the marble cake has remained a staple in cookbooks for hundreds of years.
You might wonder when is the best time to bake such a beautiful cake, and the answer is truly anytime you want to feel a bit of joy. It is the perfect choice for a birthday celebration because it looks festive even without a lot of heavy frosting or complex decorations. You can also make it for a simple afternoon tea with your friends or family to make a regular day feel much more special and elegant. From an emotional perspective, baking is a very therapeutic activity that allows you to slow down and focus on the present moment as you measure and stir. If you are someone who watches your fitness, making a cake at home is a much better choice than buying one from a store. When you bake at home, you have total control over the quality of the flour, the type of sugar, and the freshness of the eggs. You can ensure there are no strange chemicals or preservatives that are often found in packaged snacks. Eating a slice of homemade cake can be a wonderful part of a balanced lifestyle because it provides genuine satisfaction for your sweet cravings. It is much better to eat one high quality slice of homemade cake than to eat many low quality processed snacks that leave you feeling empty.
The taste of this cake is something that will linger in your memory long after the last crumb is gone from the plate. The chocolate parts are deep and slightly earthy, while the vanilla parts are creamy and bright, creating a symphony of flavors that work in perfect harmony. This recipe focuses on keeping the cake moist by using the right ratio of fats and liquids, which is the secret to a professional result. Many beginner bakers worry about the cake being too dry, but we will use techniques like room temperature ingredients to prevent that from happening. As you prepare to start this journey, imagine the joy on the faces of your loved ones when you bring this masterpiece to the table. It is a gift of time and effort that shows people how much you care about them. Baking is an act of love, and this marble chocolate cake is one of the best ways to share that love with the world. Get your apron ready and clear your kitchen counter, because we are about to create something truly wonderful together. You do not need any fancy tools or expensive machines to get this done correctly. Just bring your passion for good food and a desire to learn something new today.
Ingredients You Will Need
To make the perfect marble chocolate cake, you should gather all your ingredients before you start mixing. Having everything ready on the counter makes the process much smoother and prevents mistakes. Here is exactly what you will need for this recipe:
-
Two and a half cups of all purpose flour
-
Two teaspoons of baking powder
-
Half a teaspoon of salt
-
One cup of unsalted butter at room temperature
-
One and three quarters cups of white granulated sugar
-
Four large eggs at room temperature
-
One teaspoon of pure vanilla extract
-
One cup of whole milk at room temperature
-
One third cup of unsweetened cocoa powder
-
Three tablespoons of hot water
-
Two tablespoons of extra sugar for the chocolate part
Step by Step Method
Step 1: Prepare Your Oven and Pan
The very first thing you must do is turn on your oven. Set it to three hundred and fifty degrees Fahrenheit. This ensures the oven is nice and hot by the time your cake is ready to go inside. Next, take a standard loaf pan or a round cake pan and rub some butter all over the inside. After greasing it with butter, sprinkle a little bit of flour inside and shake it around until the bottom and sides are covered. Tap out any extra flour into the sink. This prevents your beautiful cake from sticking to the pan after it is finished baking.
Step 2: Mix Your Dry Ingredients
Take a medium sized bowl and put your all purpose flour, baking powder, and salt inside. Use a whisk or a fork to stir them together very well. This step is important because it spreads the baking powder evenly through the flour. If you do not mix them well, your cake might rise unevenly or have big air bubbles in some spots and none in others. Set this bowl aside for a few minutes while you work on the wet ingredients.
Step 3: Cream the Butter and Sugar
In a large mixing bowl, put your soft butter and the one and three quarters cups of sugar. Use an electric mixer or a sturdy wooden spoon to beat them together. You want to keep going until the mixture looks pale yellow and feels very fluffy. This usually takes about three to five minutes of mixing. This process traps tiny air bubbles in the butter, which helps the cake stay light and airy instead of becoming heavy like a brick.
Step 4: Add the Eggs and Vanilla
Now it is time to add your eggs to the butter and sugar mixture. Add them one at a time, beating well after each egg is added. This helps the eggs blend perfectly without breaking the creamy texture of the butter. After all four eggs are in, pour in your vanilla extract and mix again. The mixture might look a little bit curdled at this point, but do not worry because that is completely normal and will fix itself once we add the flour.
Step 5: Combine Wet and Dry Ingredients
Now you will add your flour mixture and your milk to the butter mixture. You should do this in three parts. Start by adding about one third of the flour and stir it in gently. Then add half of the milk and stir again. Repeat this until all the flour and milk are used up. Make sure you end with the last bit of flour. Stir only until you can no longer see any white streaks of flour. If you stir too much at this stage, the cake will become tough and chewy instead of soft.
Step 6: Create the Chocolate Batter
Take another smaller bowl and put your cocoa powder, the extra two tablespoons of sugar, and the hot water inside. Stir this until it becomes a smooth and thick chocolate paste. Now, take about two cups of your plain vanilla batter and put it into this bowl with the chocolate paste. Use a spatula to fold them together until the batter is a beautiful dark brown color. You now have two different colors of batter ready to go.
Step 7: Layer the Batters in the Pan
Take your prepared cake pan and begin by putting a few large spoonfuls of the vanilla batter in different spots on the bottom. Then, put spoonfuls of the chocolate batter in the gaps between the vanilla. Keep doing this, layering the colors on top of each other, until both bowls are empty. It should look like a messy checkerboard of white and brown in the pan. Do not smooth it out too much because we want those distinct layers to stay separate for now.
Step 8: Swirl the Colors
This is the most exciting part of the whole process. Take a butter knife or a wooden skewer and dip it into the batter. Drag the knife through the batter in a zigzag motion or make a few big swirls. Do not do this too many times or the colors will just mix together and turn into a light brown cake. You only need a few passes to create the marble effect. Stop as soon as it looks pretty to your eyes.
Step 9: Bake the Cake
Put the pan into the center of your preheated oven. Let it bake for about fifty to sixty minutes. You will know it is done when the top is golden and a toothpick inserted into the middle comes out clean or with just a few dry crumbs. Try not to open the oven door too often during the first forty minutes because the cold air can make the cake sink in the middle. The smell in your kitchen will be absolutely amazing at this point.
Step 10: Cool and Enjoy
Once the cake is done, take it out of the oven and let it sit in the pan for about ten minutes. This allows the structure of the cake to firm up so it does not break when you remove it. After ten minutes, carefully turn the pan over to let the cake come out. Place it on a wire rack to cool completely. Cooling it on a rack prevents the bottom from getting soggy. Once it is cool, you can slice it and see the beautiful marble patterns you created.
Why This Recipe Is Special
This marble chocolate cake recipe is special because it focuses on simplicity and high quality results for home bakers. One of the biggest benefits of this recipe is the incredible texture that stays moist for a long time. Many cakes dry out after just one day, but the balance of milk and butter here ensures a soft crumb that lasts. It is also special because it uses basic ingredients that most people already have in their pantry. You do not need to go to a specialty store to find rare items to make this dessert.
From a health perspective, this cake is a better choice than store bought alternatives because you are using real butter instead of processed oils or trans fats. You can also choose to use organic eggs or unbleached flour to make it even more natural. Because you are making it yourself, you can be sure there are no artificial colors or flavors added to the batter. The dark cocoa powder also contains antioxidants which are good for your body in small amounts. It is a treat that nourishes the soul and provides a sense of accomplishment that you cannot get from a box mix.
The taste is truly the star of the show here. The contrast between the aromatic vanilla and the deep cocoa creates a complex flavor profile that appeals to both children and adults. It is not a one note dessert; every bite offers a slightly different ratio of flavors depending on the swirl. This makes the eating experience much more interesting and enjoyable. It is the kind of recipe that becomes a family tradition, passed down from one generation to the next because it is reliable and delicious every single time.
Extra Tips for Better Taste
To take your marble cake to the next level, there are a few creative things you can try. First, always make sure your ingredients like eggs and butter are at room temperature before you start. Cold ingredients do not mix together well and can cause the batter to separate. If you forgot to take your eggs out of the fridge, you can put them in a bowl of warm water for five minutes to take the chill off. This simple step makes a huge difference in how smooth your batter will be.
Another tip is to use high quality cocoa powder. The darker and richer the cocoa, the better the chocolate swirls will taste. Some people like to add a tiny pinch of espresso powder to the chocolate batter. You will not taste the coffee, but it makes the chocolate flavor seem much deeper and more intense. You can also add some small chocolate chips to the chocolate batter for a bit of extra texture and surprise in every bite. This adds a nice crunch that contrasts well with the soft cake.
When you are doing the swirling, remember that less is more. It is very tempting to keep swirling because it looks so cool, but if you go too far, the colors will blend into a single muddy color. Three or four big loops with your knife are usually enough to get a perfect result. Finally, once the cake is cooled, you can top it with a simple chocolate ganache or a dusting of powdered sugar to make it look even more professional. A little bit of glaze can add extra moisture and a beautiful shine to your finished masterpiece.
Final Thoughts
Baking a marble chocolate cake is a rewarding experience that fills your home with warmth and your heart with pride. It is a reminder that beautiful things can be created with simple tools and a bit of effort. Whether you are baking this for a special party or just to have something sweet for the week, the process is just as enjoyable as the result. Do not be afraid to make mistakes, as even a messy marble cake tastes delicious. Every time you bake, you will get better at feeling the texture of the batter and knowing exactly when the cake is finished. Share your creation with your friends and neighbors, and enjoy the smiles that a homemade treat always brings to people. You have now mastered a classic recipe that will serve you well for many years to come.
Nutrition Details
Knowing what is in your food is important for a healthy lifestyle. Below is a table that shows the estimated nutrition for this marble chocolate cake. Please remember that these numbers can change depending on the specific brands of ingredients you choose to use.
| Nutrient | Amount Per Serving |
| Calories | 320 kcal |
| Total Fat | 15 grams |
| Saturated Fat | 9 grams |
| Cholesterol | 65 milligrams |
| Sodium | 180 milligrams |
| Total Carbohydrates | 42 grams |
| Dietary Fiber | 1 gram |
| Sugars | 25 grams |
| Protein | 4 grams |
| Calcium | 4 percent |
| Iron | 6 percent |