 Skip to content
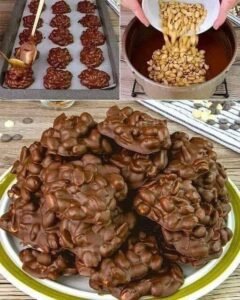
The world of homemade treats is filled with many complicated recipes that require hours of standing in the kitchen and using expensive tools but this chocolate peanut clusters recipe is different. This recipe is all about taking two of the most classic flavors in the entire world and bringing them together in a way that is incredibly simple and satisfying for everyone. At its core this dish is a crunchy and sweet combination of roasted peanuts that are completely smothered in a smooth and rich layer of melted chocolate. It is a no bake dessert which means you do not even have to turn on your oven to create something that tastes like it came from a fancy candy shop. Whether you are a master chef or someone who has never made a single snack in your life you will find that these clusters are nearly impossible to mess up. They represent the beauty of minimal ingredients creating a maximum impact on your palate while providing a wonderful texture that is both snappy and creamy at the same time.
People absolutely love these little treats because they provide a perfect balance between the salty crunch of the nuts and the sugary sweetness of the chocolate. There is something deeply nostalgic about the smell of chocolate melting on the stove and the sound of peanuts being stirred into a thick and glossy mixture. Because they are bite sized they are the ultimate snack for sharing with friends or keeping in a jar for a quick boost of energy during a long afternoon. Many people appreciate how these clusters can be customized to be as dark or as milky as you prefer depending on the type of chocolate you choose to buy at the grocery store. It is a recipe that brings a sense of accomplishment without the stress of measuring tiny amounts of yeast or worrying about a cake falling flat in the oven. Families love making these together because even young children can help with the stirring and the scooping which makes the final result taste even better because it was a shared effort.
You should consider making these chocolate peanut clusters whenever you need a quick gift that shows you care or when you want to treat yourself after a long week of hard work. They are the ideal companion for a movie night at home or a holiday party where you want to offer something that everyone will recognize and enjoy immediately. From a fitness perspective peanuts are a great source of plant based protein and healthy fats which can help you feel full and satisfied when you are craving a little bit of dessert. The emotional pull of this recipe is tied to the comfort that chocolate provides especially during the colder months when a warm and sweet snack feels like a tiny piece of luxury. You can also make a large batch and store them in the freezer so you always have a healthyish treat ready for whenever a sugar craving hits you out of nowhere. It is a versatile recipe that fits into any lifestyle whether you are a busy parent or a student looking for a cheap and delicious way to fuel your study sessions.
Ingredients You Will Need
To create these wonderful and crunchy chocolate peanut clusters you only need a few simple items that you can find in the baking aisle of any local supermarket.
-
Two cups of semi sweet chocolate chips or dark chocolate chunks
-
One cup of milk chocolate chips to add extra creaminess
-
Three cups of roasted and salted peanuts without the shells
-
One tablespoon of coconut oil to make the chocolate shiny and smooth
-
Half a teaspoon of pure vanilla extract for a deeper aroma
-
A tiny pinch of sea salt for topping if you like the sweet and salty mix
Step by Step Method
Making these clusters is a very straightforward process that only takes a few minutes of active work and some patience while they set in the refrigerator.
First you need to prepare your workspace so that everything goes smoothly once the chocolate is melted. Take two large baking sheets and line them with parchment paper or wax paper. This is a very important step because it prevents the chocolate from sticking to the metal pan and makes it much easier to peel the clusters off once they are hard. Make sure you have enough space in your fridge to fit these pans later on.
Next you will need to melt your chocolate using either a microwave or a double boiler on the stove. If you are using a microwave place all the chocolate chips and the tablespoon of coconut oil into a large glass bowl that is safe for heat. Microwave the mixture for thirty seconds and then take it out to stir with a spatula. Continue heating in short bursts of fifteen seconds and stir each time until the chocolate is completely liquid and looks very shiny. If you prefer the stove you can place a bowl over a pot of simmering water and stir until the chocolate melts gently.
Once your chocolate is melted and smooth it is time to add the flavor and the crunch. Stir in the half teaspoon of vanilla extract and then pour all three cups of roasted peanuts into the bowl. Use a large spoon to fold the peanuts into the chocolate until every single nut is fully coated in the dark and sweet mixture. You want to make sure there are no dry spots left on the peanuts so that the clusters stay together properly.
Now you will form the actual clusters on your prepared baking sheets. Use a tablespoon or a small ice cream scoop to drop mounds of the chocolate peanut mixture onto the parchment paper. You can make them as large or as small as you like but a standard tablespoon size is usually perfect for a single serving. Leave about an inch of space between each mound so they do not grow together into one giant piece of candy.
While the chocolate is still a little bit wet you can sprinkle a tiny bit of sea salt over the top of each cluster if you want that professional gourmet look. This also helps to bring out the richness of the cocoa and the saltiness of the peanuts. If you want to be extra creative you could even add some colorful sprinkles or a few crushed pretzels on top at this stage.
Place the baking sheets into the refrigerator and let them sit for at least one hour. The cold temperature will help the chocolate and the coconut oil to harden and bond with the peanuts. You will know they are ready when you can touch the top of a cluster and it feels firm and does not leave any chocolate on your finger. If you are in a big hurry you can put them in the freezer for about twenty minutes to speed up the cooling process.
Once the clusters are fully set peel them gently off the parchment paper and place them into a clean container or a glass jar. You should store them in a cool place or in the fridge to keep the chocolate from softening especially if your kitchen is warm. They are now ready to be eaten and enjoyed by you and your lucky friends.
Why This Recipe Is Special
This recipe is special because it takes very little effort but yields a result that tastes like high quality handmade candy. The use of roasted and salted peanuts provides a deep and earthy flavor that cuts through the sugar of the chocolate to create a complex taste profile. Peanuts are known for being a good source of Vitamin E and magnesium which are important for keeping your heart healthy and your energy levels stable throughout the day.
When you use a mix of dark and milk chocolate you get the best of both worlds because the dark chocolate provides antioxidants and a bold flavor while the milk chocolate keeps the texture soft and approachable. It is also special because it is naturally gluten free which makes it a safe and delicious option for people who have sensitivities to wheat. Making your own snacks at home allows you to control the quality of the ingredients and ensures that there are no weird chemicals or cheap oils used in the process.
Extra Tips for Better Taste
If you want to experiment with this recipe there are many ways to add even more flavor and texture to your clusters. You could try replacing one cup of the peanuts with some raisins or dried cranberries to add a chewy and fruity element to the mix. For those who love a bit of heat a tiny pinch of chili powder stirred into the melted chocolate can create a surprising and sophisticated Mexican chocolate flavor that pairs perfectly with the salty nuts.
Another great tip is to toast the peanuts in a dry pan for two minutes before adding them to the chocolate. This wakes up the natural oils in the nuts and makes them even crunchier and more aromatic. If you find that your chocolate is too thick to stir easily you can add another teaspoon of coconut oil to thin it out without changing the flavor. For a beautiful presentation you could drizzle some white chocolate over the finished clusters after they have hardened to create a striped pattern that looks very fancy.
Final Thoughts
Sharing food is one of the oldest ways that people connect with each other and these chocolate peanut clusters are the perfect tool for that connection. They are simple and honest and delicious which makes them a favorite for people of all ages. We hope that this recipe brings a little bit of sweetness to your day and that you find joy in the process of creating something yummy from scratch. Whether you eat them all yourself or give them away as a gift you can be proud of the tasty treat you have made. Keep exploring the kitchen and enjoy every bite.
Nutrition Details
This table shows the approximate nutrition for one serving of chocolate peanut clusters which is about two medium sized clusters.
Disclaimer
Please remember that every person has a different body and different health needs so the way your body reacts to sugar and fats may vary. This recipe is meant for occasional enjoyment as part of a balanced diet and is not a substitute for medical or nutritional advice. If you have a peanut allergy or are sensitive to caffeine in chocolate please do not consume this recipe. Always talk to a doctor or a health expert if you have questions about how certain foods might affect your specific health conditions. The nutritional values are estimates and can change based on the specific brands and sizes of the ingredients you use in your own home.